Setting Up Outlook and Microsoft 365 (Delegated Access)
This guide shows you how to set up Outlook OAuth2 authentication with EmailEngine using delegated access, where each user signs in interactively through Microsoft's OAuth2 consent flow. This works with Outlook.com, Hotmail.com, and Microsoft 365 accounts. You can use either IMAP/SMTP or Microsoft Graph API as the email backend.
If you need to access Microsoft 365 mailboxes without interactive user login (e.g., for automated systems, helpdesk integrations, or centralized management), see Outlook Application Access (Client Credentials) instead. Application access lets an admin grant access to any mailbox in the organization using a single set of credentials.
Overview
EmailEngine supports two types of Outlook OAuth2 integrations:
- Delegated access (this page) - Each user signs in and grants access to their own mailbox. Supports both IMAP/SMTP and MS Graph API backends. Works with personal Microsoft accounts and Microsoft 365.
- Application access (separate guide) - An admin grants the application access to any mailbox in the organization. Uses MS Graph API only. Microsoft 365 only, no personal accounts.
Email Backend Options
With delegated access, you can choose between two backend options:
IMAP/SMTP Backend:
- Standard email protocols
- Works like any other email account
- Simpler setup
Microsoft Graph API Backend:
- Native Microsoft 365 integration
- Better performance for high-volume accounts
- Access to Microsoft-specific features
- Supports shared mailboxes natively
This guide covers both options.
Choosing IMAP/SMTP vs MS Graph API
| Feature | IMAP/SMTP | MS Graph API |
|---|---|---|
| Setup Complexity | Simple | Moderate |
| Performance | Good | Excellent |
| Search Capabilities | Full text search | Very limited |
| Shared Mailboxes | Limited support | Native support |
| Outlook Categories | Not available | Supported via labels |
| Connection Protocol | IMAP/SMTP | REST API |
| Microsoft-Specific Features | Limited | Full access |
| Works with other providers | Yes | No |
MS Graph API has significantly more limited search capabilities compared to IMAP. IMAP supports full-text search across message headers and body content, while MS Graph API search is much more restricted. If your application requires advanced message search functionality, use IMAP/SMTP instead.
Recommendation:
- Use IMAP/SMTP for simple setups, for compatibility, and when you need IMAP's search
- Use MS Graph API for shared mailboxes and Microsoft 365 enterprise features (but be aware of search limitations)
Step 1: Create Azure AD Application
Go to Azure Portal and navigate to Microsoft Entra ID > App Registrations.
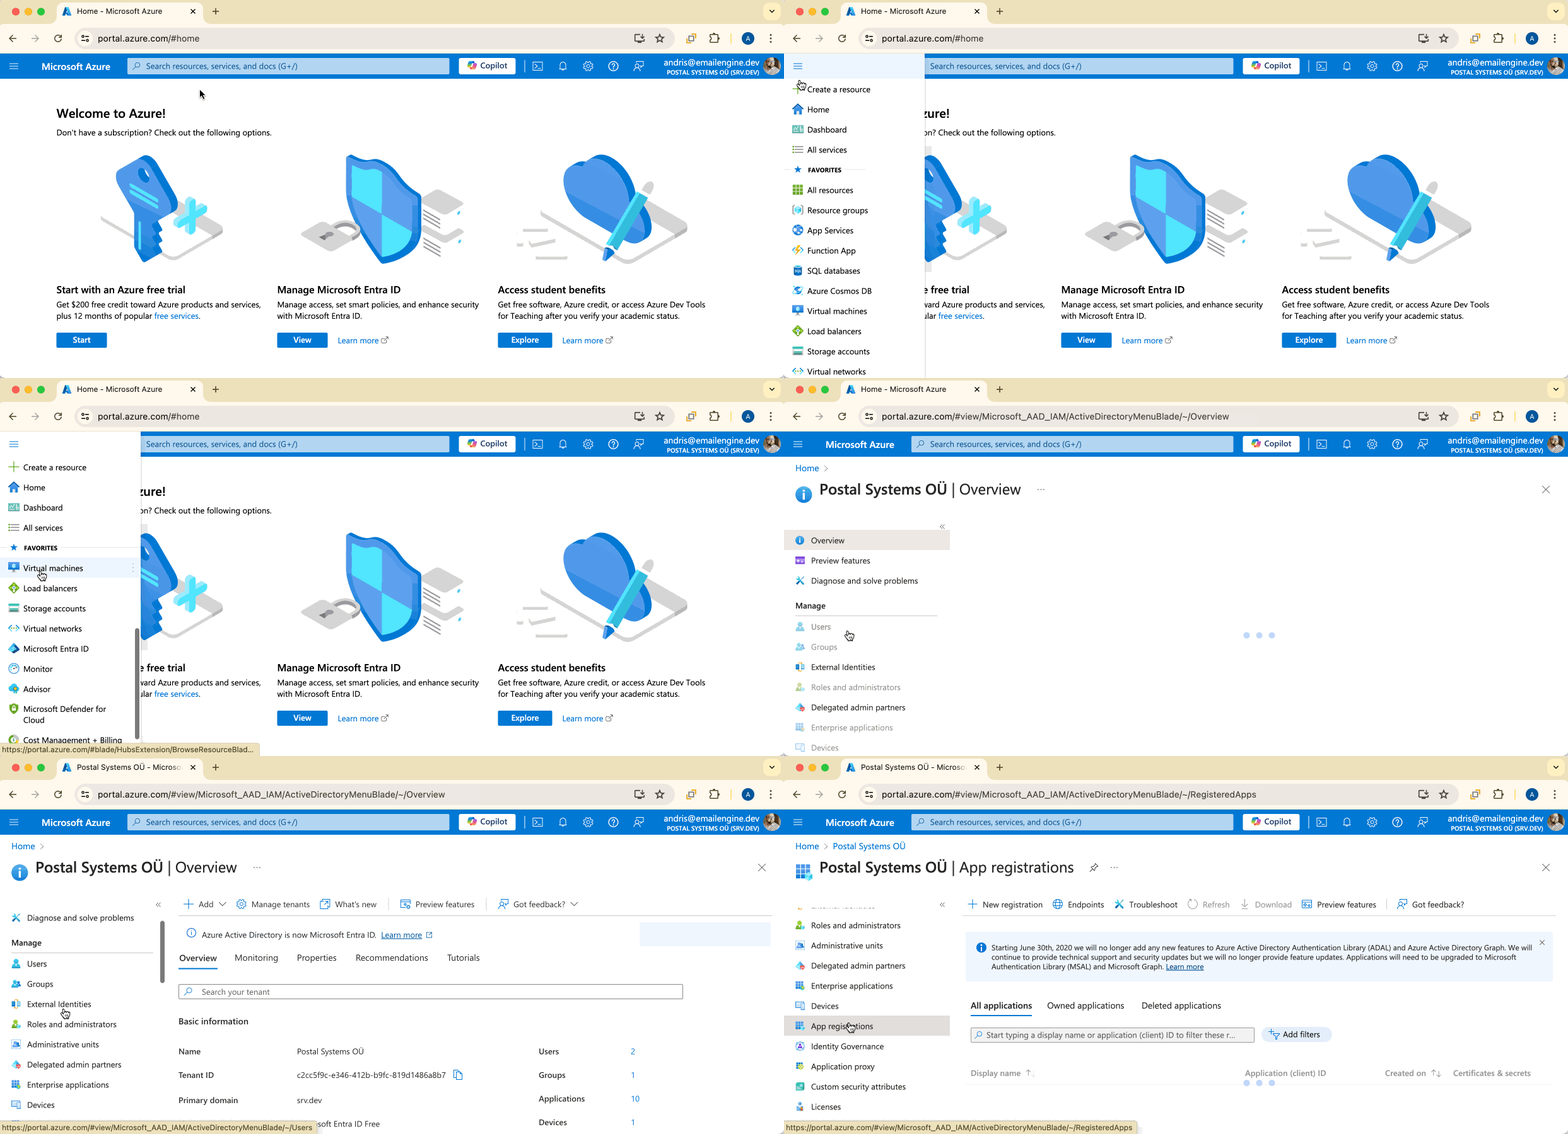
Click New registration.
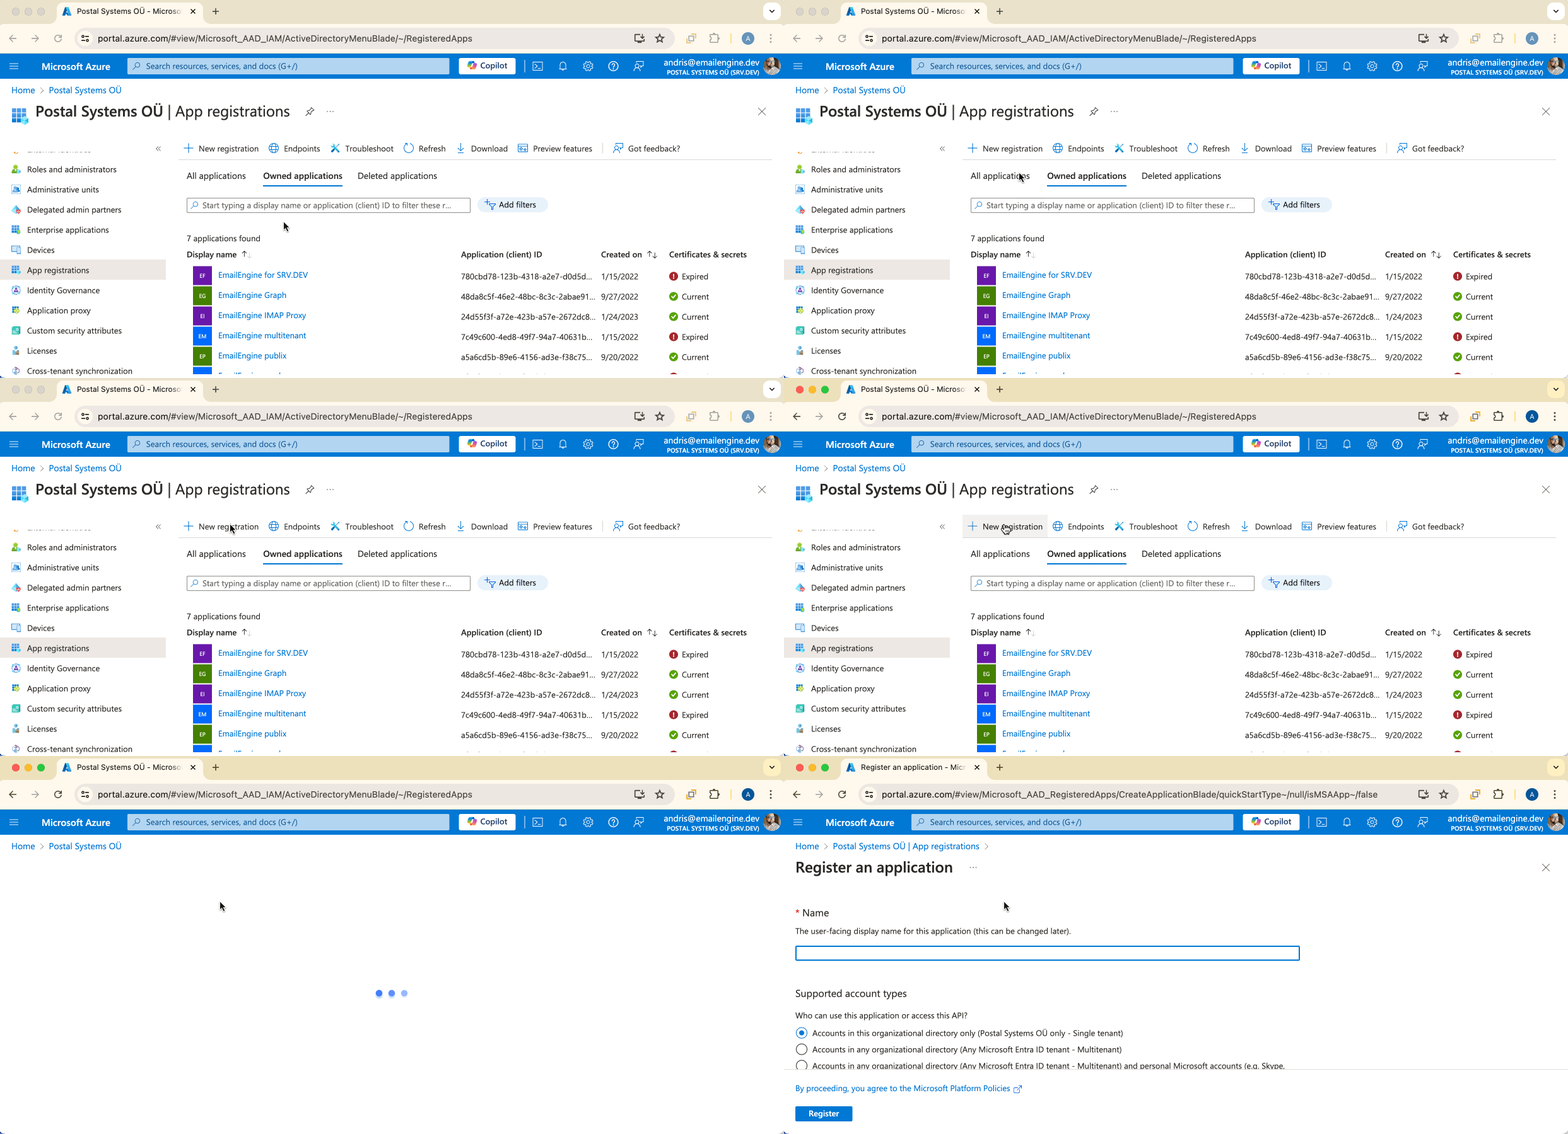
Step 2: Configure Application Registration
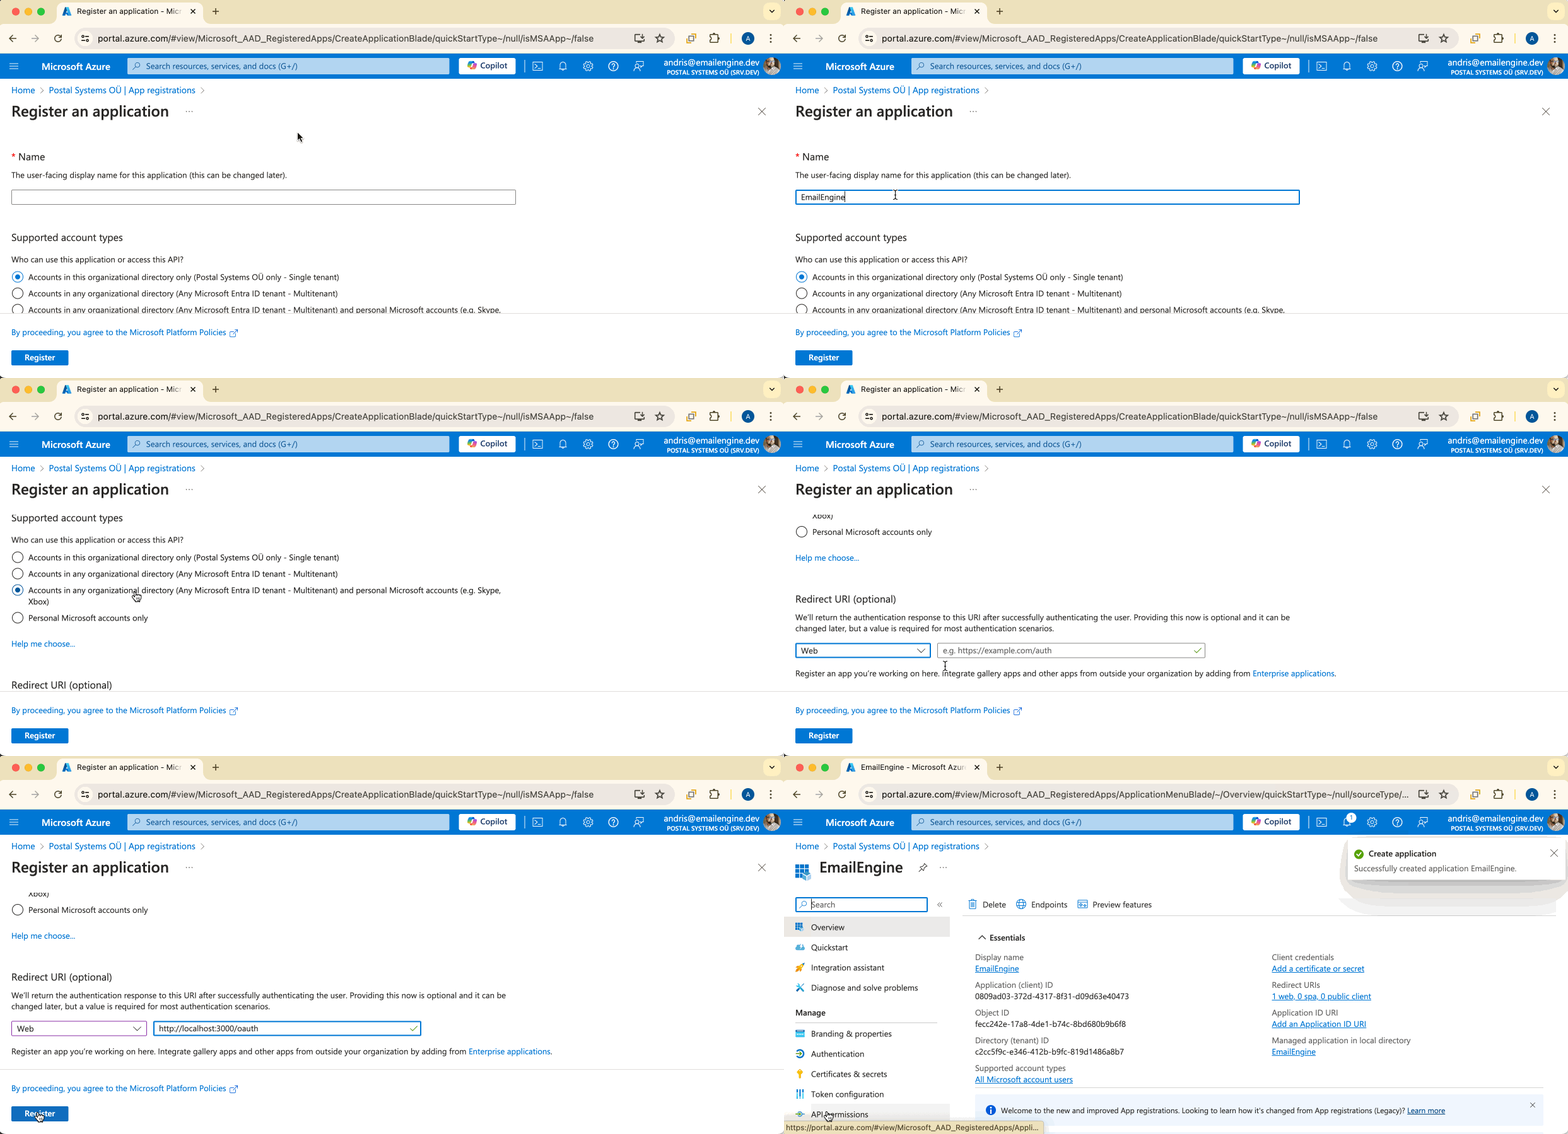
Application Name
Choose a name that users will see in the authorization form. Make it clear and recognizable (e.g., "EmailEngine" or "YourApp Email Integration").
Supported Account Types
Choose who can use this application:
Personal Microsoft accounts only:
- Only free @hotmail.com, @outlook.com, @live.com accounts
- Select: "Personal Microsoft accounts only"
Single tenant (organization only):
- Only accounts from your Microsoft 365 organization
- Select: "Accounts in this organizational directory only"
Multi-tenant (any organization):
- Any Microsoft 365 organization account
- Does NOT include personal Microsoft accounts
- Select: "Accounts in any organizational directory"
Multi-tenant + personal accounts:
- Both Microsoft 365 and personal accounts
- Most flexible option
- Select: "Accounts in any organizational directory and personal Microsoft accounts"
For maximum compatibility, select "Accounts in any organizational directory and personal Microsoft accounts" unless you have specific requirements.
Microsoft Cloud Environments
EmailEngine supports multiple Microsoft cloud environments for government and regional deployments (since v2.46.0). Select the appropriate cloud in the Azure cloud environment field when creating an Outlook OAuth2 application to use the correct endpoints.
| Cloud | Value | Use Case |
|---|---|---|
| Azure Global | global | Standard Microsoft 365 (default) |
| GCC High | gcc-high | US Government L4 |
| DoD | dod | US Department of Defense L5 |
| Azure China | china | China (operated by 21Vianet) |
Cloud Environment Details
Azure Global (default)
The standard commercial Microsoft 365 environment used by most organizations:
- Entra ID Endpoint:
https://login.microsoftonline.com - MS Graph API:
https://graph.microsoft.com - IMAP Host:
outlook.office365.com - SMTP Host:
smtp.office365.com - Azure Portal: portal.azure.com
GCC High (US Government L4)
For US government agencies and contractors requiring FedRAMP High + DoD SRG Impact Level 4 compliance:
- Entra ID Endpoint:
https://login.microsoftonline.us - MS Graph API:
https://graph.microsoft.us - IMAP Host:
outlook.office365.us - SMTP Host:
smtp.office365.us - Azure Portal: portal.azure.us
DoD (US Department of Defense L5)
For US Department of Defense requiring Impact Level 5 (ITAR and DoD SRG):
- Entra ID Endpoint:
https://login.microsoftonline.us - MS Graph API:
https://dod-graph.microsoft.us - IMAP Host:
outlook-dod.office365.us - SMTP Host:
outlook-dod.office365.us - Azure Portal: portal.azure.us
Azure China (21Vianet)
Microsoft Azure operated by 21Vianet in China for compliance with Chinese regulations:
- Entra ID Endpoint:
https://login.chinacloudapi.cn - MS Graph API:
https://microsoftgraph.chinacloudapi.cn - IMAP Host:
partner.outlook.cn - SMTP Host:
partner.outlook.cn - Azure Portal: portal.azure.cn
Configuring Cloud Environment via API
When creating an Outlook OAuth2 application via API, specify the cloud parameter:
curl -X POST "https://emailengine.example.com/v1/oauth2" \
  -H "Authorization: Bearer YOUR_TOKEN" \
  -H "Content-Type: application/json" \
  -d '{
    "name": "Outlook GCC High",
    "provider": "outlook",
    "enabled": true,
    "cloud": "gcc-high",
    "clientId": "YOUR_CLIENT_ID",
    "clientSecret": "YOUR_CLIENT_SECRET",
    "redirectUrl": "https://emailengine.example.com/oauth",
    "authority": "organizations"
  }'
Valid values for cloud:
global(default if not specified)gcc-highdodchina
OAuth2 Scopes by Cloud
Each cloud environment uses different scope URLs. EmailEngine automatically uses the correct scopes based on the selected cloud:
IMAP/SMTP Scopes:
| Cloud | IMAP Scope | SMTP Scope |
|---|---|---|
| Global | https://outlook.office.com/IMAP.AccessAsUser.All | https://outlook.office.com/SMTP.Send |
| GCC High | https://outlook.office365.us/IMAP.AccessAsUser.All | https://outlook.office365.us/SMTP.Send |
| DoD | https://outlook.office365.us/IMAP.AccessAsUser.All | https://outlook.office365.us/SMTP.Send |
| China | https://partner.outlook.cn/IMAP.AccessAsUser.All | https://partner.outlook.cn/SMTP.Send |
MS Graph API Scopes:
| Cloud | Mail.ReadWrite | Mail.Send |
|---|---|---|
| Global | https://graph.microsoft.com/Mail.ReadWrite | https://graph.microsoft.com/Mail.Send |
| GCC High | https://graph.microsoft.us/Mail.ReadWrite | https://graph.microsoft.us/Mail.Send |
| DoD | https://dod-graph.microsoft.us/Mail.ReadWrite | https://dod-graph.microsoft.us/Mail.Send |
| China | https://microsoftgraph.chinacloudapi.cn/Mail.ReadWrite | https://microsoftgraph.chinacloudapi.cn/Mail.Send |
For government clouds (GCC High, DoD) and sovereign clouds (China), you must:
- Register your Azure AD application in the corresponding Azure portal for that cloud environment
- Your organization must have a subscription in that cloud environment
- Use the correct Azure portal URL for app registration
You cannot use an app registered in the global Azure portal for government or China cloud environments.
Redirect URI
Platform: Select Web
URI: Your EmailEngine URL with /oauth path:
http://localhost:3000/oauth(for local testing)https://emailengine.example.com/oauth(for production)
The redirect URL must match exactly what you'll configure in EmailEngine later. Mismatches will cause OAuth failures.
Click Register to create the application.
Step 3: Copy Application (Client) ID
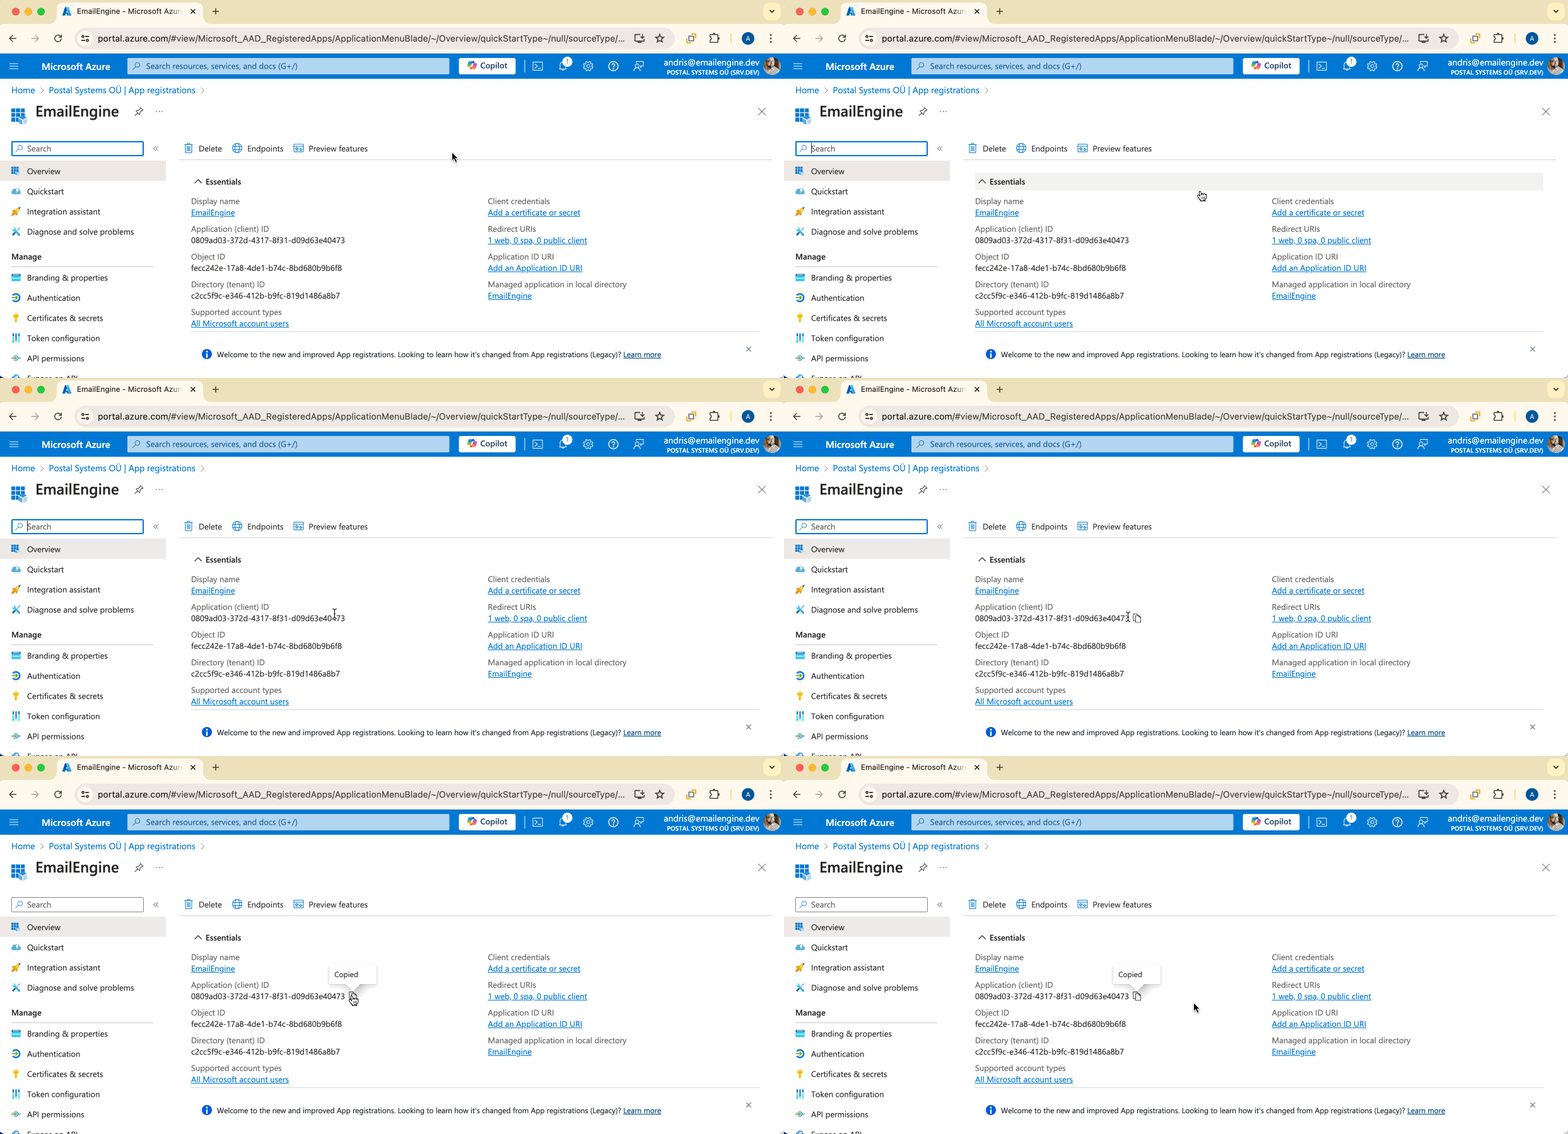
On the application overview page, find and copy the Application (client) ID. You'll need this for EmailEngine configuration.
Keep this page open - you'll come back to it.
Step 4: Configure API Permissions
Click API permissions in the left menu.
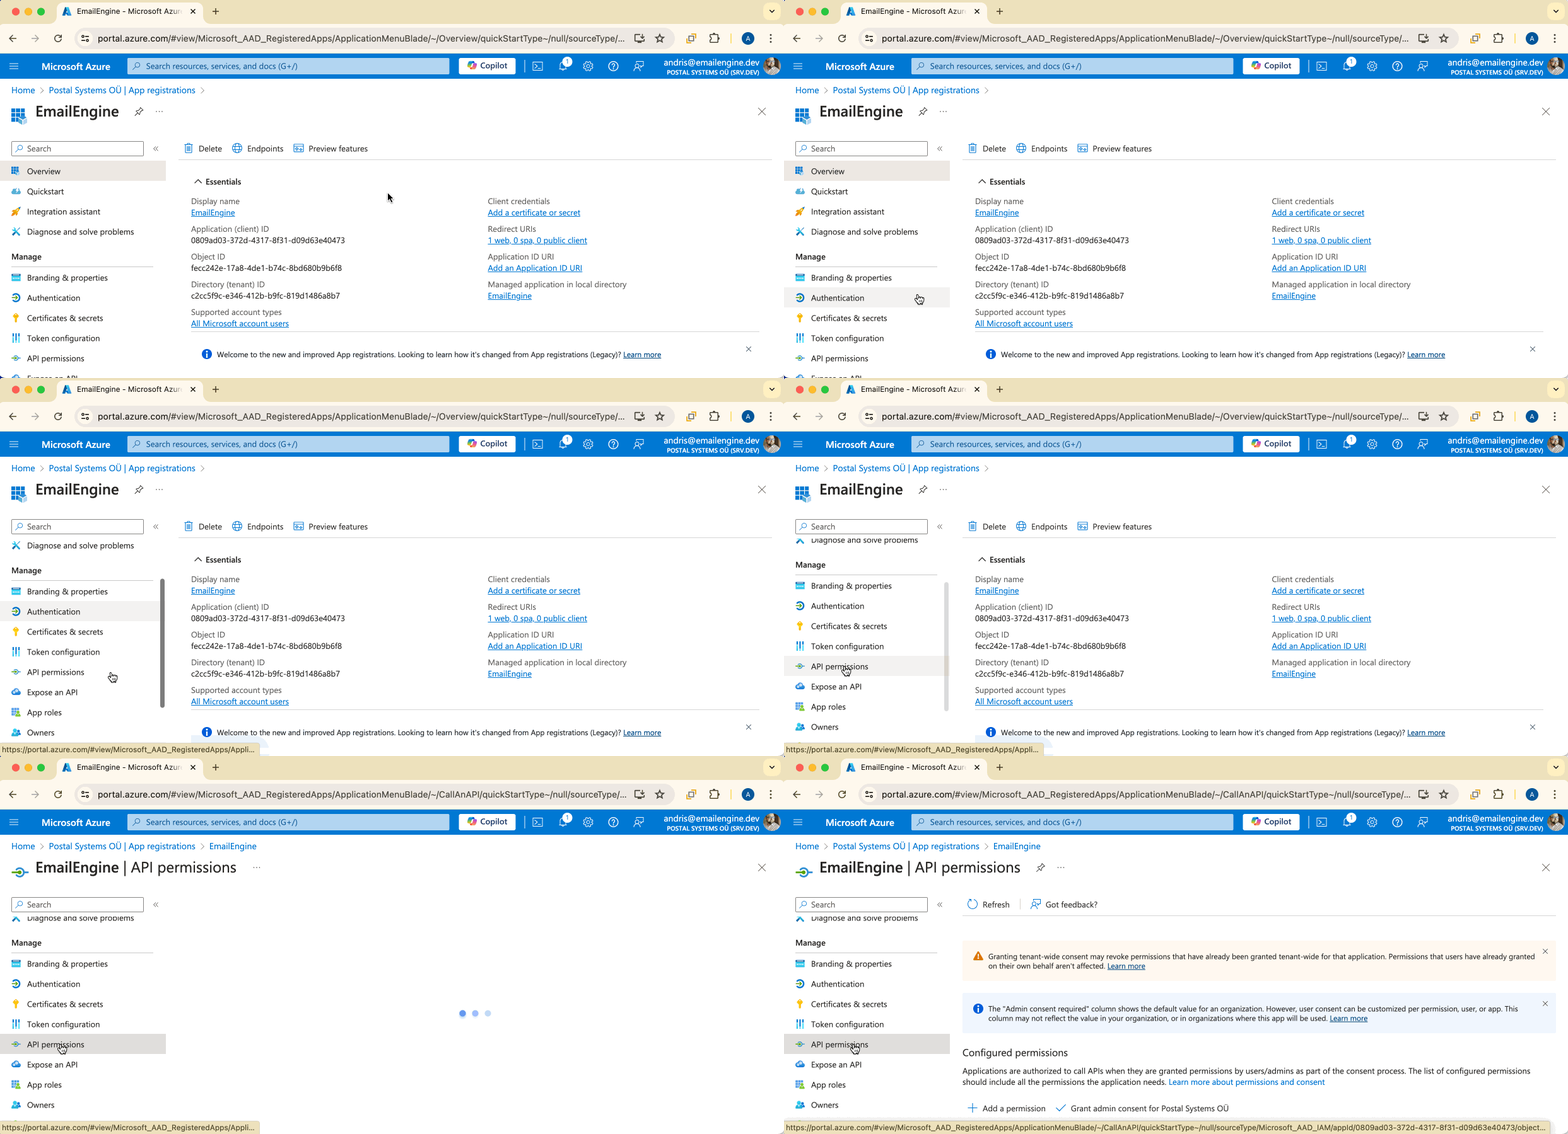
By default, only User.Read permission exists. Click Add a permission.
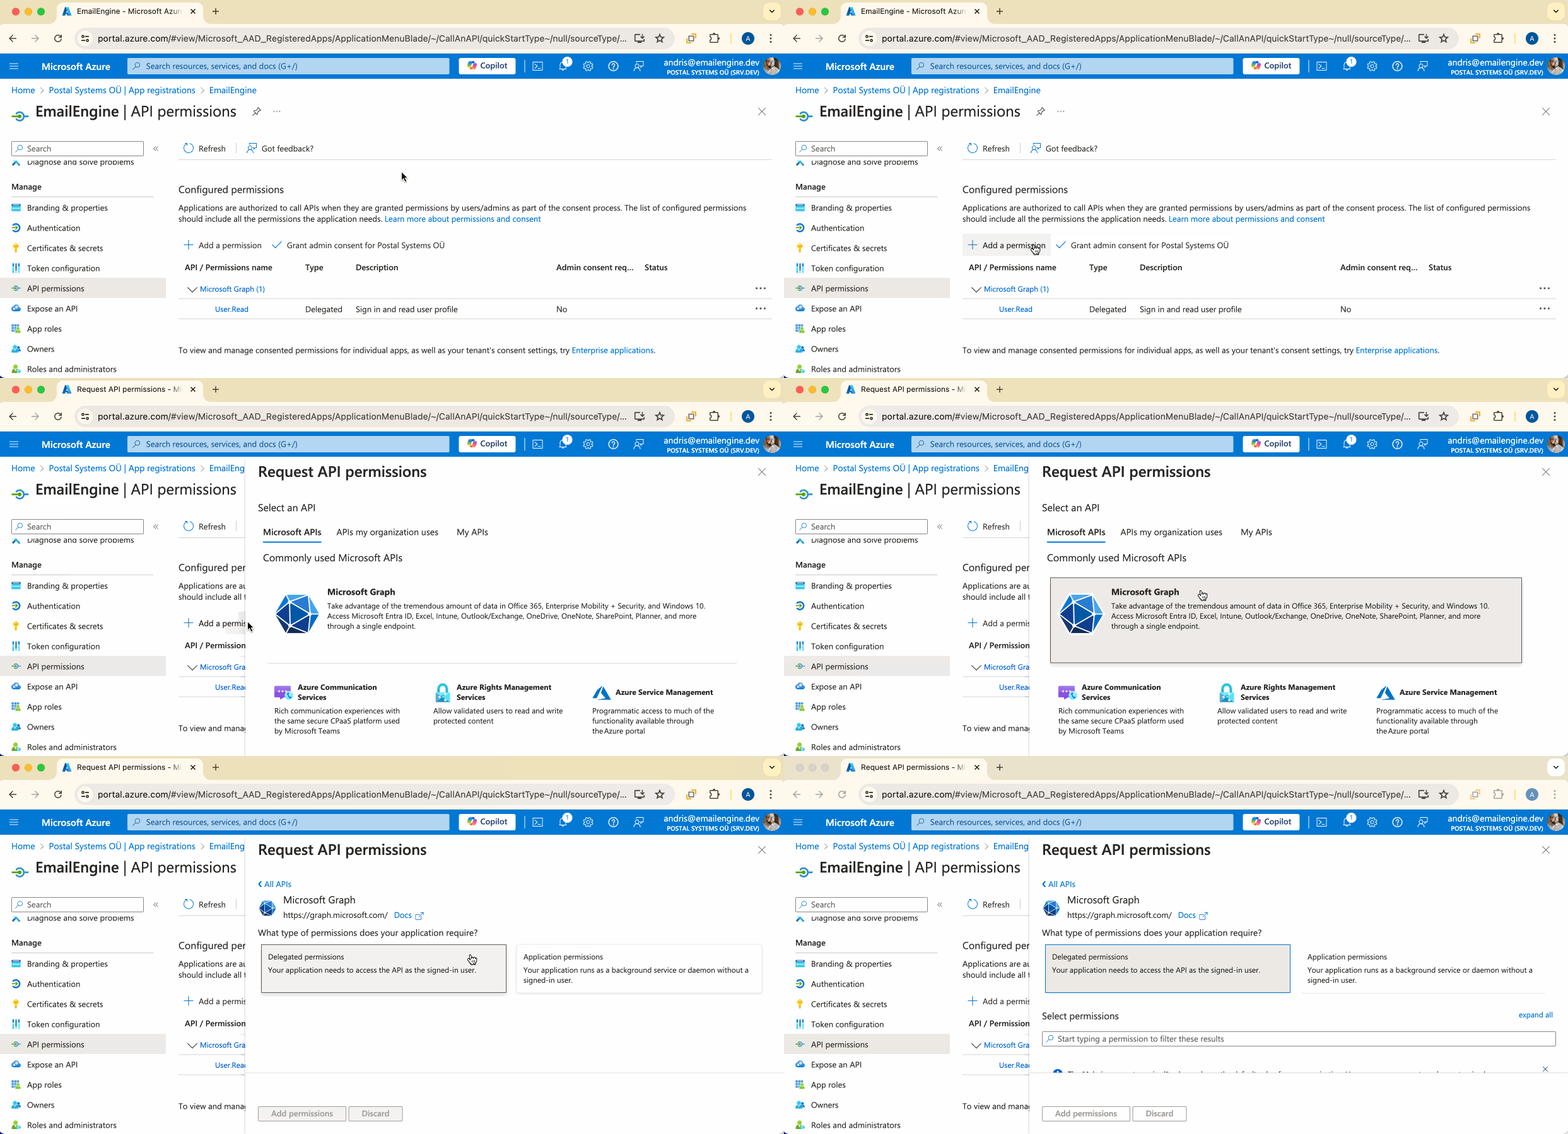
Select Microsoft Graph and then Delegated permissions.
Make sure you select the Delegated permissions tab, not Application permissions. Application permissions are used for application access (client credentials), which is a different setup flow. Delegated permissions allow the app to act on behalf of a signed-in user.
For IMAP/SMTP Backend
Add these permissions:
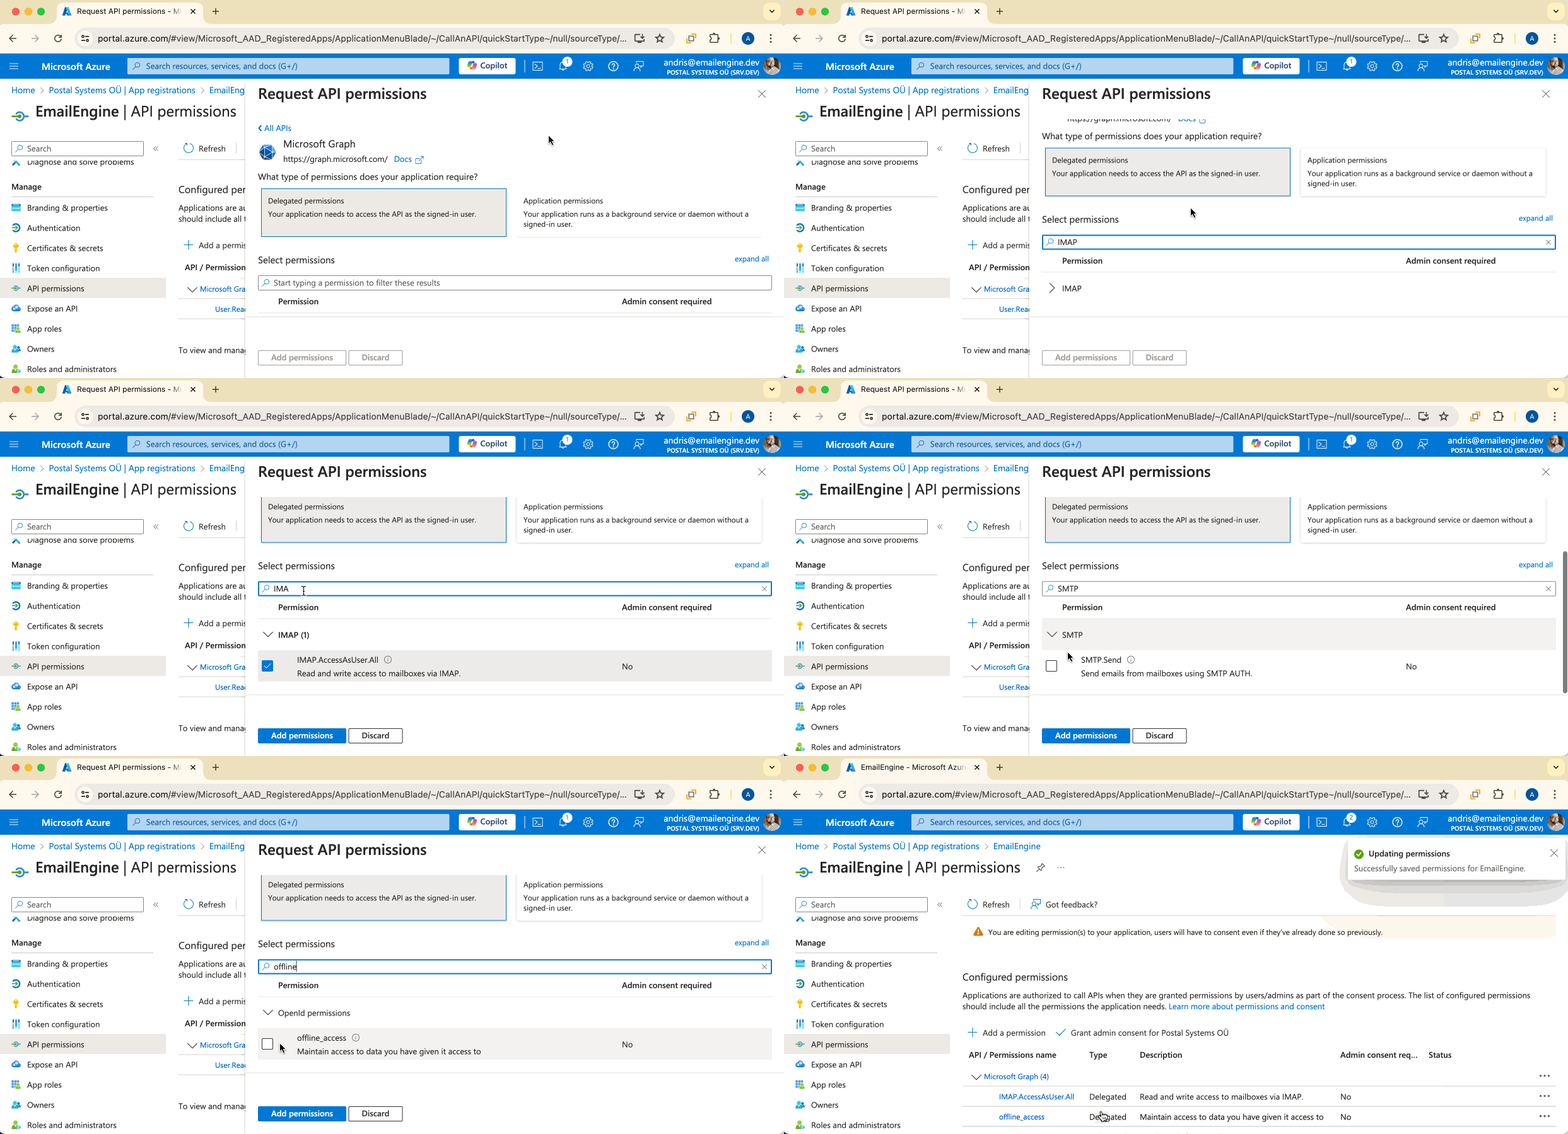
IMAP.AccessAsUser.All- For IMAP accessSMTP.Send- For sending emails via SMTPoffline_access- For token refresh
The offline_access scope is required in both cases. It allows EmailEngine to renew access tokens in the background without user interaction.
For MS Graph API Backend
Add these permissions instead:
Mail.ReadWrite- For reading and managing emailsMail.Send- For sending emailsoffline_access- For token refresh
An EmailEngine OAuth2 app requests one set of scopes, selected by its Base scopes setting: either the IMAP/SMTP scopes or the Mail.* scopes. Register two OAuth2 apps in EmailEngine if you need both backends against the same Azure application.
Verify all required permissions are listed, then continue to the next step.
Step 5: Create Client Secret
Click Certificates & secrets in the left menu.
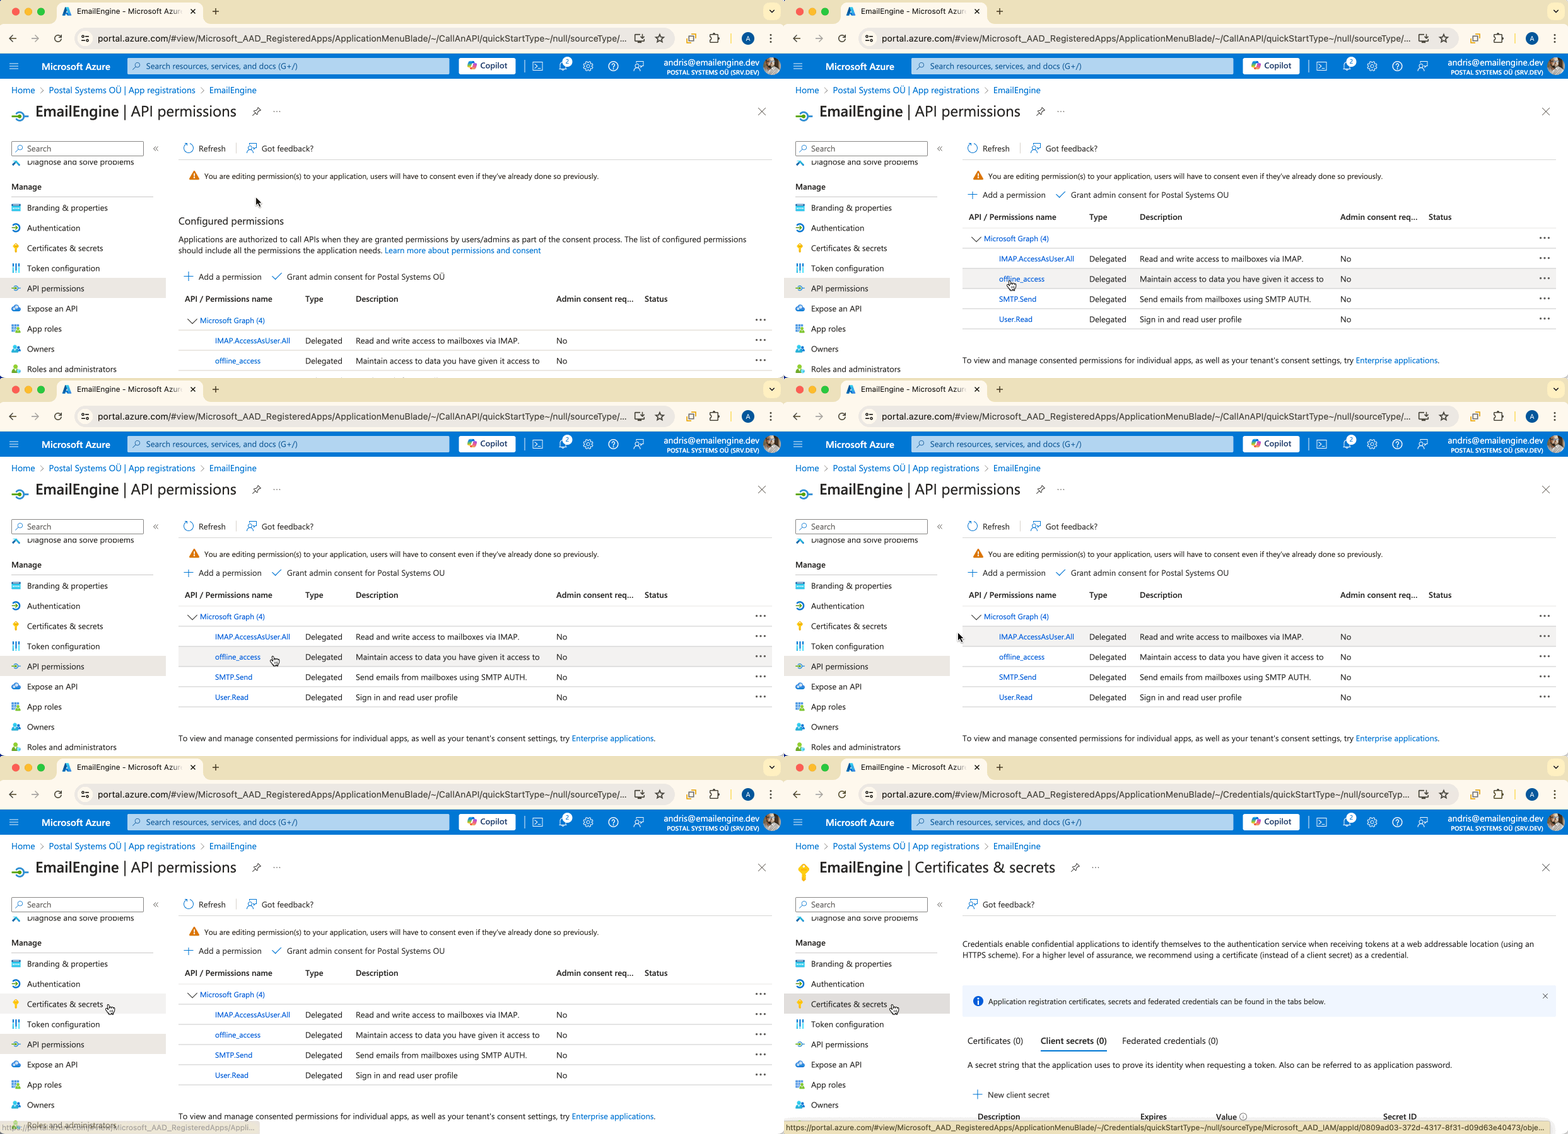
Click New client secret.
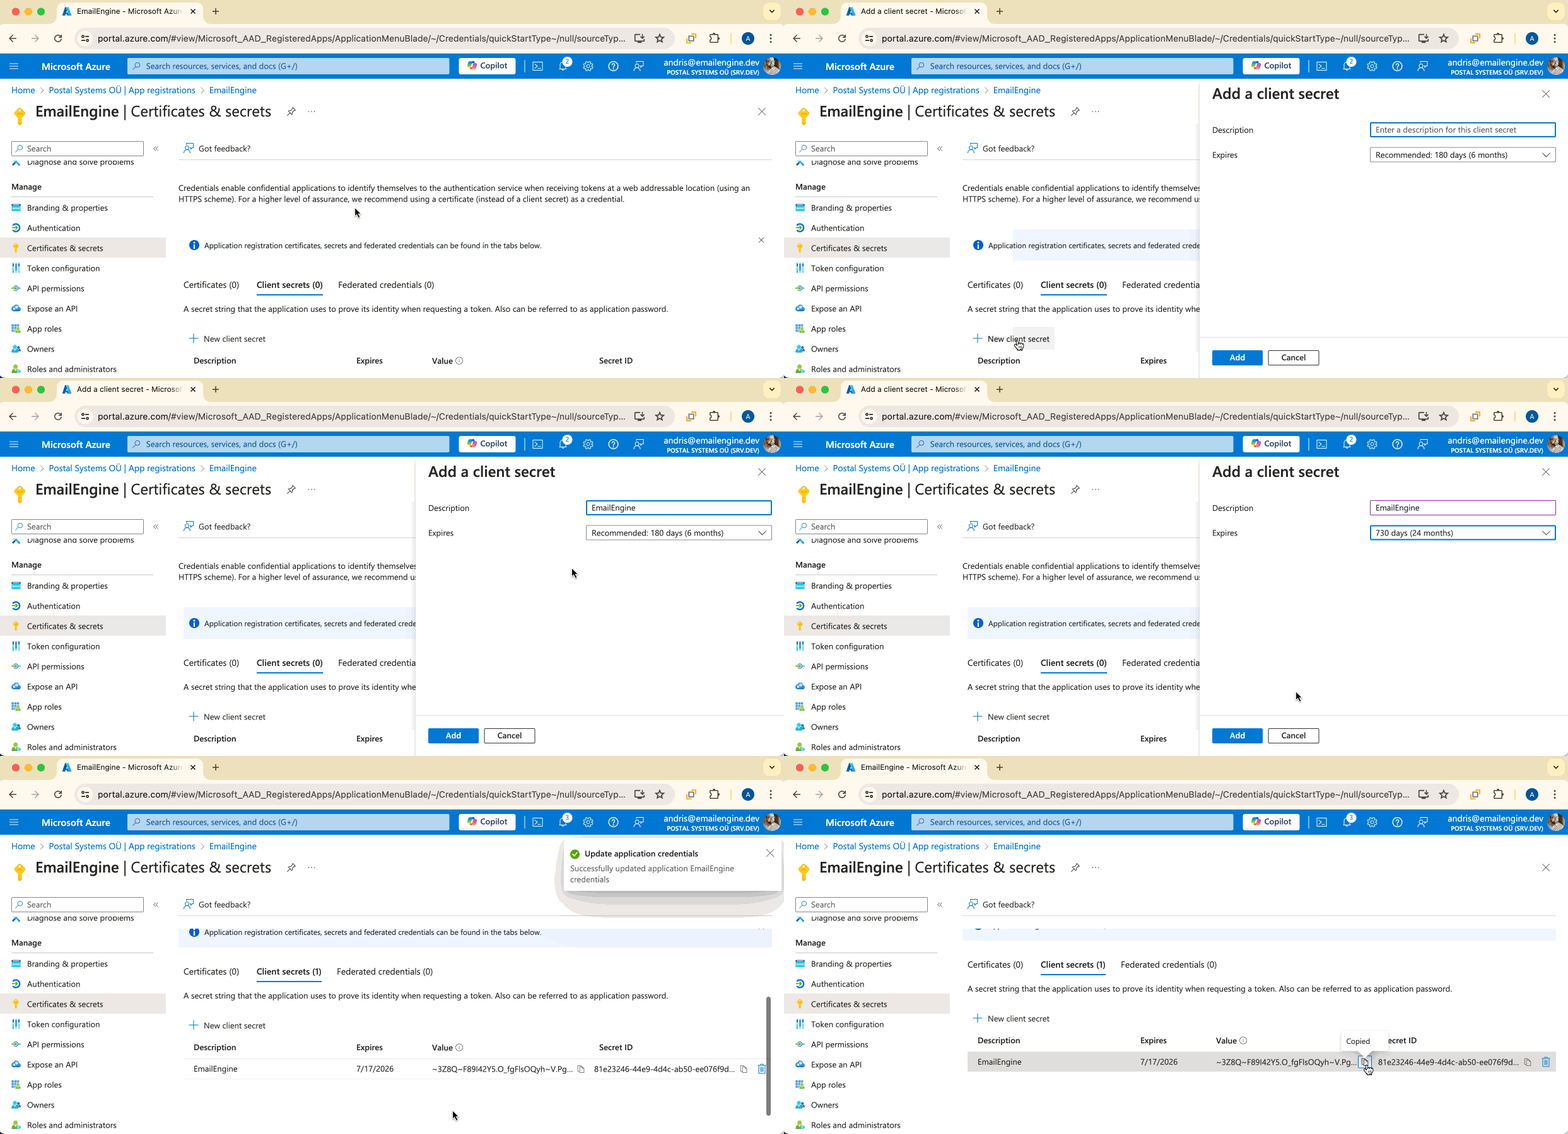
Configure Secret
Description: Give it a meaningful name (e.g., "EmailEngine Secret")
Expires: Choose an expiration period you're comfortable with
- 6 months (default)
- 12 months
- 24 months
- Custom
When the secret expires, your application will stop working until you generate a new secret and update EmailEngine. Choose a longer expiration for production, but set a reminder to rotate it before expiry.
Click Add.
Copy Secret Value
The secret value is only shown once. Copy it immediately - you cannot retrieve it later. If you lose it, you'll need to generate a new secret.
Copy the value from the Value column (NOT the "Secret ID").
Step 6: Enable IMAP/SMTP (If Using IMAP Backend)
Skip this step if you're using MS Graph API as your backend.
If you're managing a Microsoft 365 organization and EmailEngine cannot connect via IMAP/SMTP, you may need to enable these protocols manually.
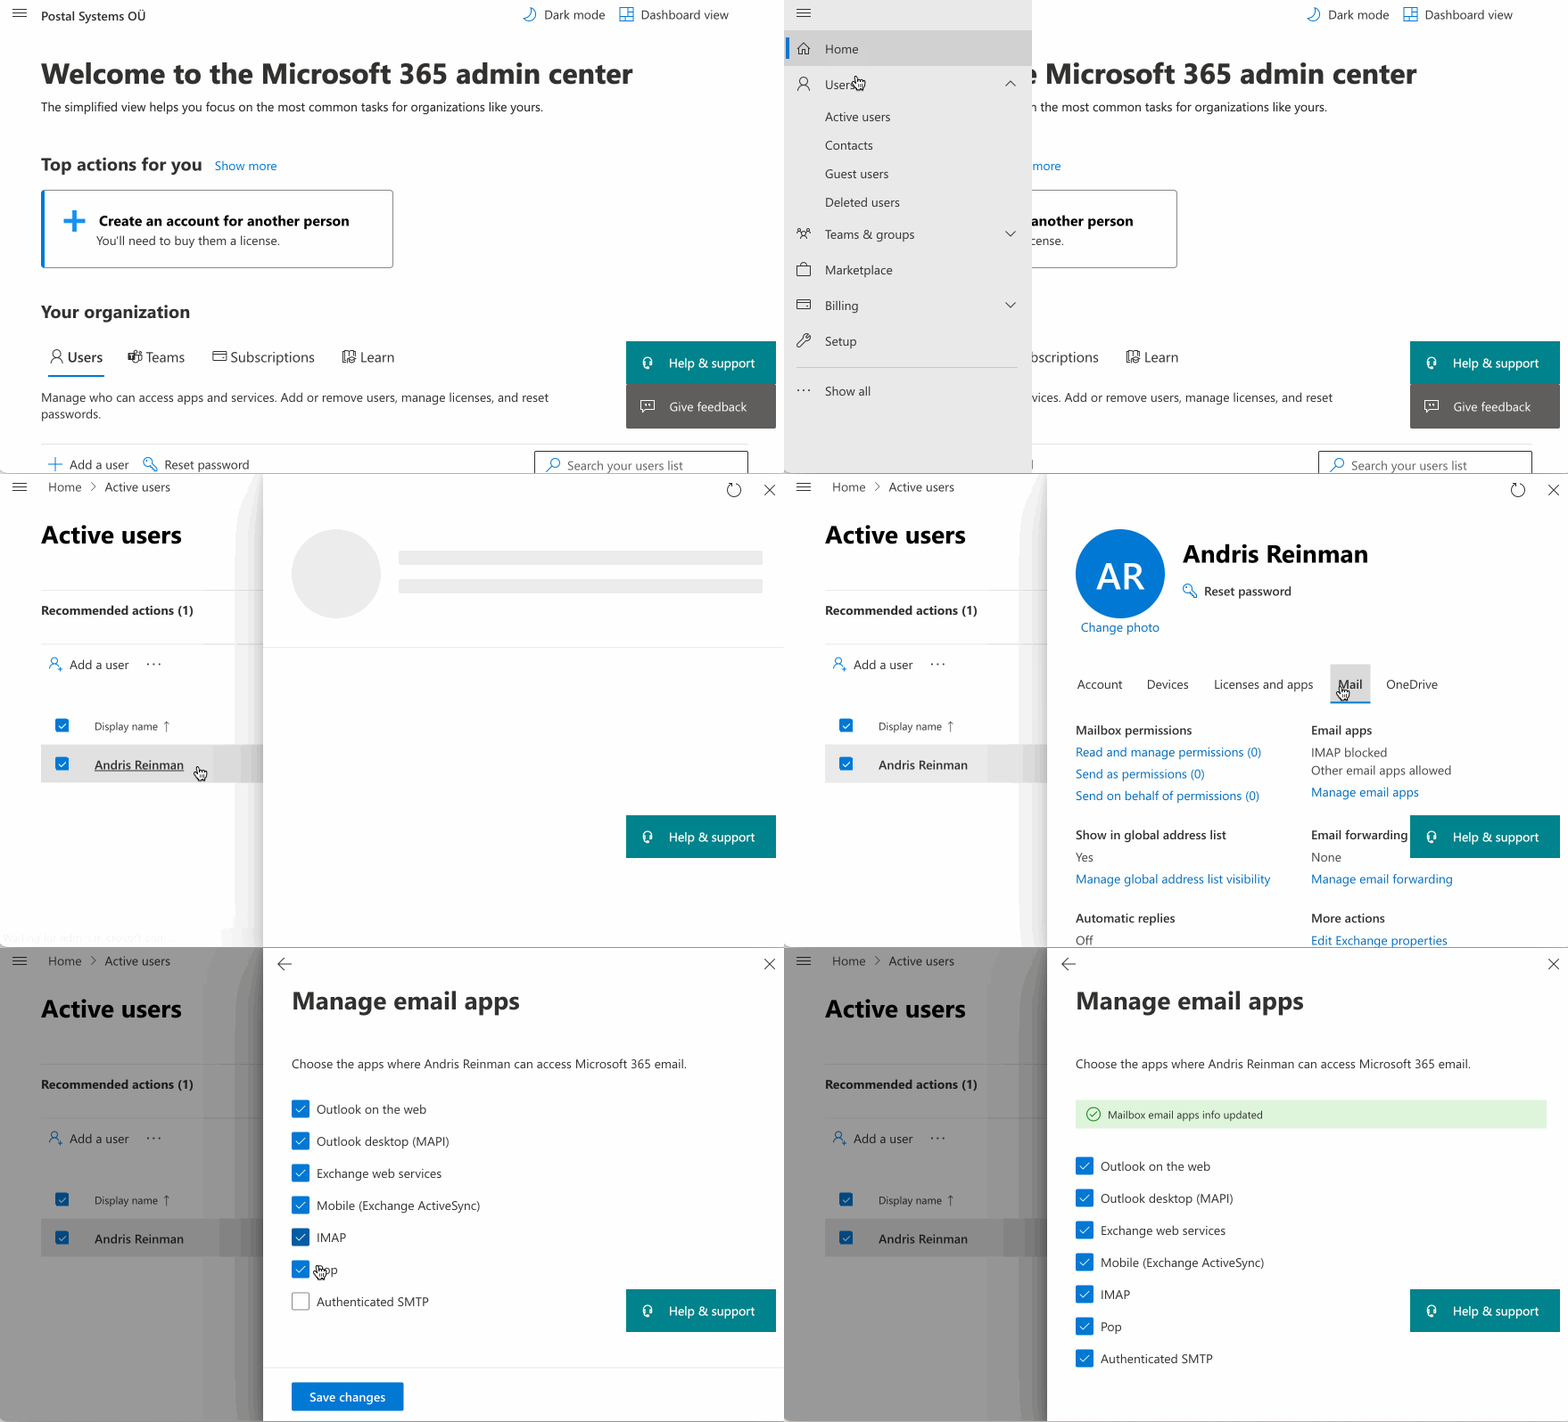
- Navigate to https://admin.microsoft.com/
- Go to Users > Active users
- Select a user
- Navigate to Mail settings
- Enable IMAP and SMTP AUTH
You may need to do this for each user or configure organization-wide settings.
Step 7: Configure EmailEngine
Now configure EmailEngine with your Azure application credentials.
Add Outlook OAuth2 Application
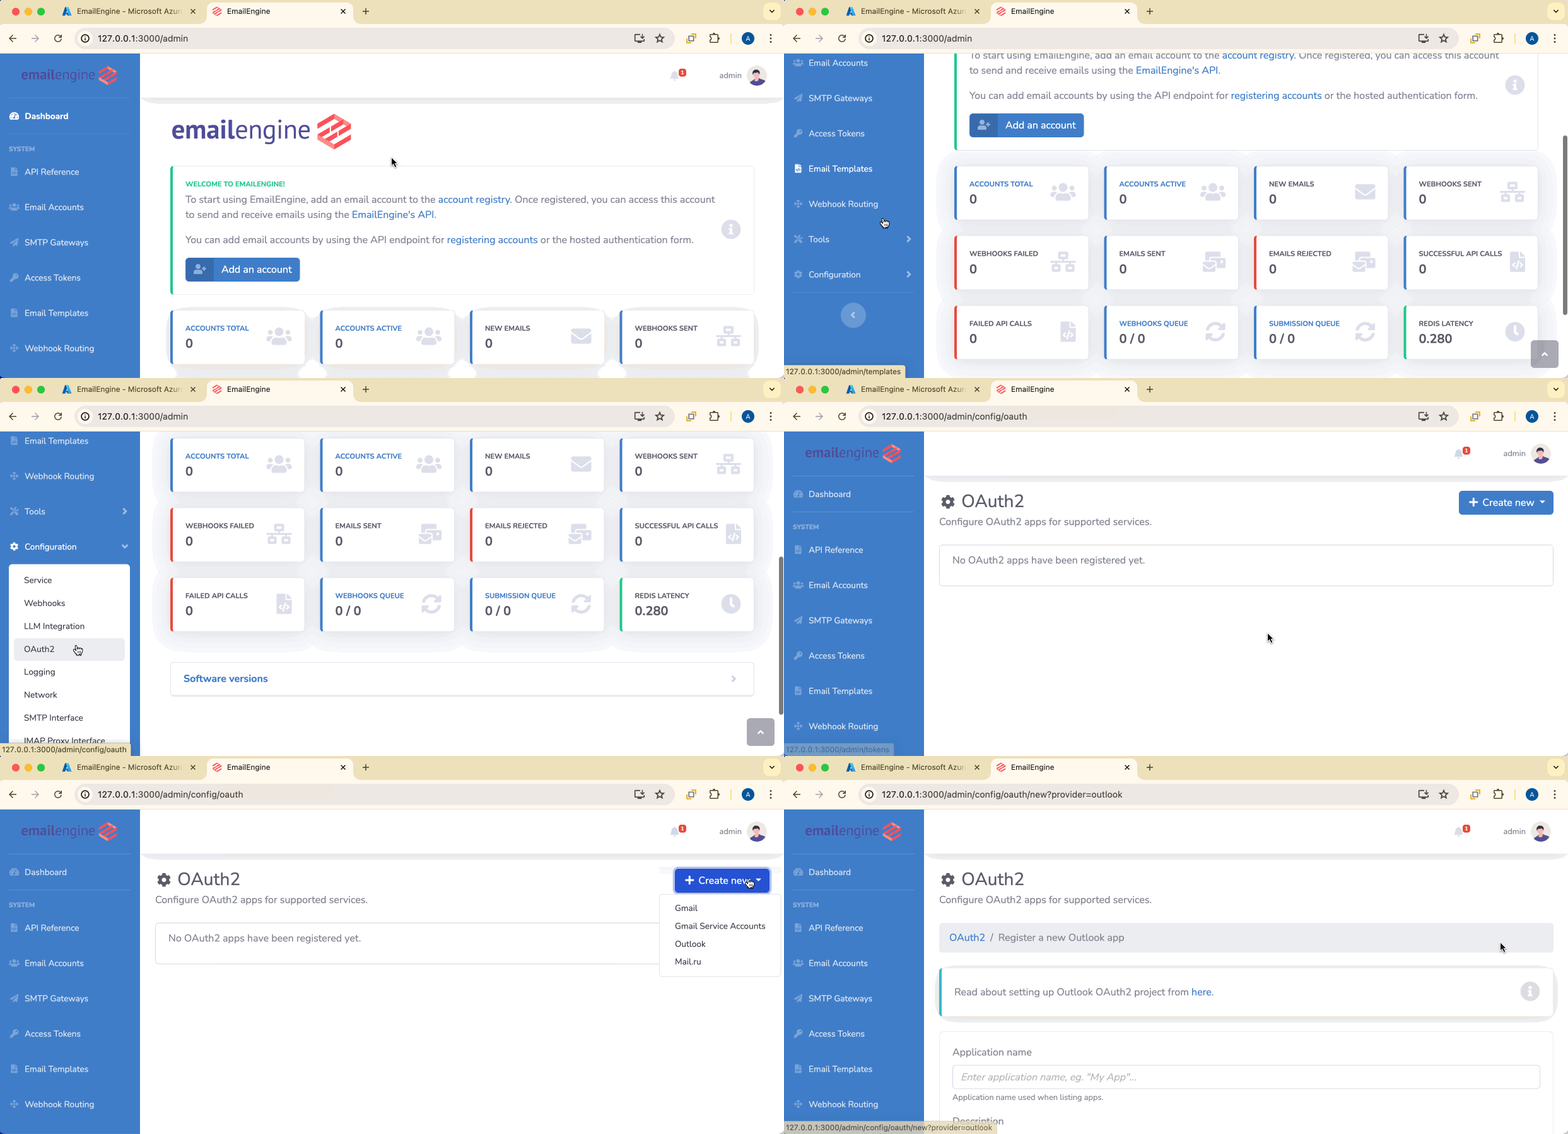
- Open EmailEngine dashboard
- Navigate to Integrations > OAuth2 Apps
- Click Create OAuth2 app
- Select Outlook (delegated) from the dropdown
Configure OAuth2 Settings
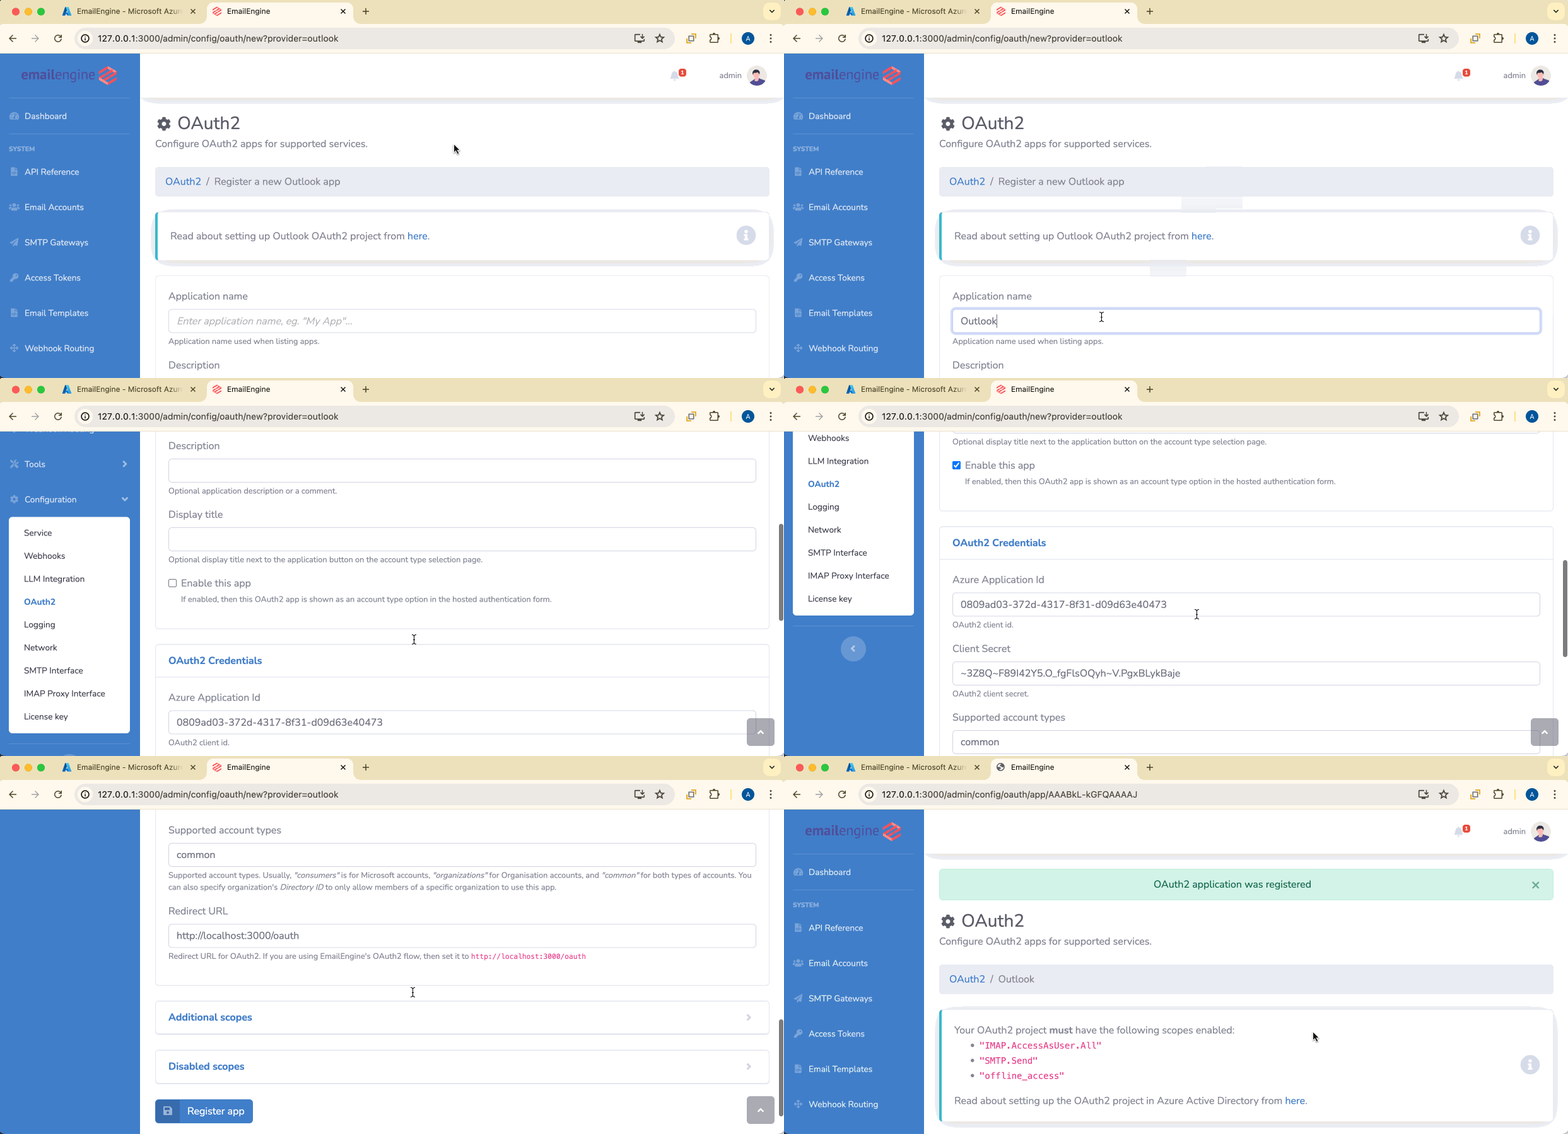
Application name: Give it a descriptive name (e.g., "Outlook OAuth2")
Enable this app: Check this box (otherwise it won't appear in authentication forms)
Azure Application Id: Paste the Application (client) ID from Azure
Client Secret: Paste the secret value you copied earlier
Azure cloud environment: Azure Global unless the tenant lives in a government or regional cloud
Redirect URL: Must match exactly what you entered in Azure:
- Example:
https://emailengine.example.com/oauth
Supported account types: Choose the option that matches your Azure registration. The API field is authority, and each option maps to one value:
| Option in EmailEngine | Azure registration | authority value |
|---|---|---|
| Accounts in any organizational directory (Multitenant) | Accounts in any organizational directory | organizations |
| Accounts in any organizational directory and personal Microsoft accounts | Accounts in any organizational directory and personal Microsoft accounts | common |
| Personal Microsoft accounts only | Personal Microsoft accounts only | consumers |
| Accounts in the specified organizational directory only (Single tenant) | Accounts in this organizational directory only | The Directory (tenant) ID, a UUID like f8cdef31-a31e-4b4a-93e4-5f571e91255a, entered in the Directory (tenant) ID field |
Base scopes: Select based on your Azure permissions:
- IMAP and SMTP (
baseScopes: "imap") - If you addedIMAP.AccessAsUser.AllandSMTP.Send - MS Graph API (
baseScopes: "api") - If you addedMail.ReadWriteandMail.Send
The base scopes you select here must match the permissions you configured in Azure. Mismatches will cause authentication failures.
Click Register app to save.
Step 8: Test the Setup
Add an Outlook account to test the OAuth2 flow.
Via Hosted Authentication Form
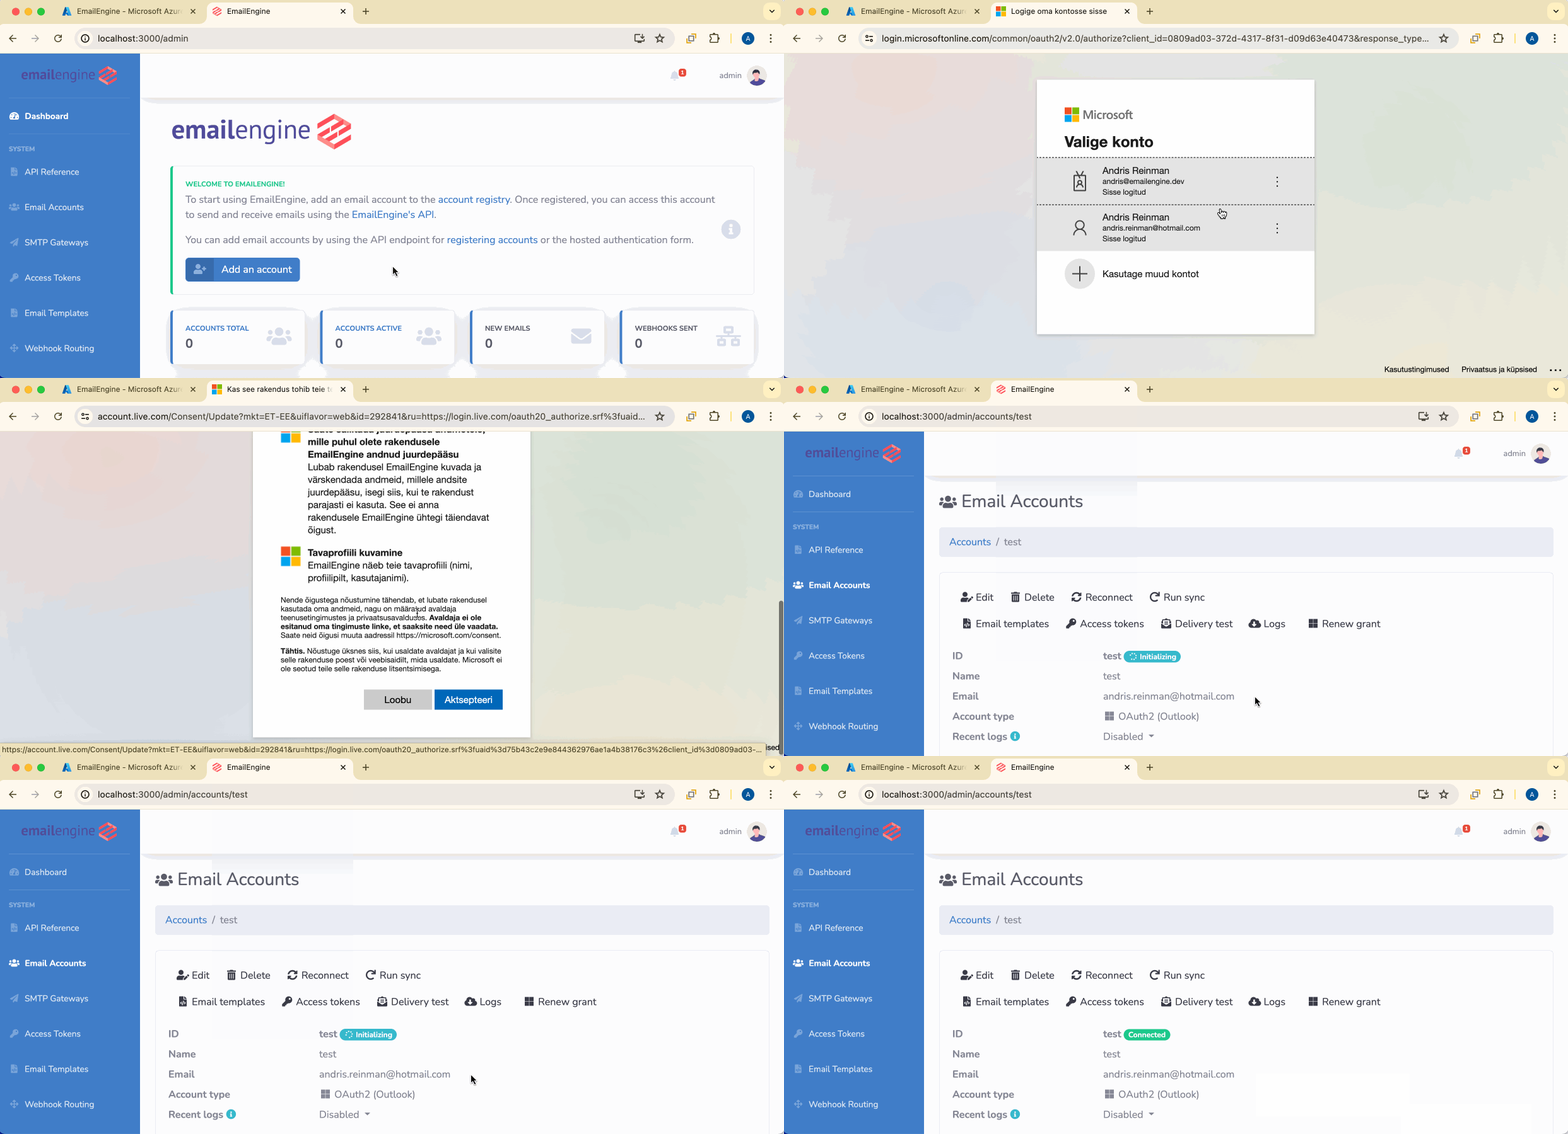
- In EmailEngine, open Accounts, click Add an account, and click Continue
- On the hosted authentication form, click Sign in with Microsoft
- Complete the OAuth2 consent flow
- EmailEngine will store the credentials and connect
The account should enter "connected" state within moments.
Via API
Generate an authentication form URL:
curl -X POST https://emailengine.example.com/v1/authentication/form \
  -H "Authorization: Bearer YOUR_ACCESS_TOKEN" \
  -H "Content-Type: application/json" \
  -d '{
    "account": "user123",
    "email": "user@outlook.com",
    "redirectUrl": "https://myapp.com/settings"
  }'
Direct the user to the returned URL.
Learn more about hosted authentication →
Direct API Account Registration
If you already have OAuth2 tokens:
curl -X POST https://emailengine.example.com/v1/account \
  -H "Authorization: Bearer YOUR_ACCESS_TOKEN" \
  -H "Content-Type: application/json" \
  -d '{
    "account": "user123",
    "name": "John Doe",
    "email": "user@outlook.com",
    "oauth2": {
      "provider": "AAABlf_0iLgAAAAQ",
      "accessToken": "ACCESS_TOKEN_FROM_MICROSOFT",
      "refreshToken": "REFRESH_TOKEN_FROM_MICROSOFT",
      "auth": {
        "user": "user@outlook.com"
      }
    }
  }'
The provider field should be the OAuth2 application ID from EmailEngine, which is a base64url encoded string like AAABlf_0iLgAAAAQ. You can find this ID in Integrations > OAuth2 Apps in the EmailEngine interface. This is NOT the Application (client) ID from Azure AD.
Shared Mailboxes
Microsoft 365 shared mailboxes are mailboxes not bound to a specific user. Multiple users can access them using their own credentials.
For shared mailboxes, Outlook Application Access (Client Credentials) is the simplest approach - no interactive login, no extra scopes, one API call per mailbox.
With delegated access, EmailEngine also supports shared mailboxes through:
- Delegated access - Add a main account, then add shared mailboxes that reference its credentials
- Direct access - Add a shared mailbox with its own OAuth2 authentication
For detailed setup instructions covering all three approaches, see the Shared Mailboxes guide.
Performance Considerations
IMAP/SMTP Limits
Exchange Online caps the number of concurrent IMAP connections per mailbox and rate-limits SMTP submission; the current figures are in Microsoft's Exchange Online limits. Every sub-connection is one more IMAP connection against that cap, so enable them only for folders that need real-time notifications, and narrow the monitored folders on large mailboxes.
MS Graph API Limits
Microsoft Graph throttles per app and per mailbox rather than by connection; see Microsoft Graph throttling limits. EmailEngine retries a throttled request with backoff on its own.
Learn more about performance tuning →
Production Considerations
Admin Consent for Organization Apps
For single-tenant or organization apps, an admin can grant consent for all users:
- In Azure AD, go to your app registration
- Click API permissions
- Click Grant admin consent for [Organization]
This pre-approves the app for all users in the organization.
Token Management
EmailEngine renews the access token with the stored refresh token whenever a connection or an API request needs one, and stores both tokens in Redis (encrypted when EENGINE_SECRET is set). When Microsoft rejects the refresh token, the account enters authenticationError and stays there until the user signs in again; EmailEngine cannot re-authorize on the user's behalf. Deleting an account discards its tokens, so re-adding it later takes a new consent flow.
Which events invalidate a Microsoft refresh token, and how long an idle one lives, is covered on the OAuth2 token management page.
Microsoft OAuth2 client secrets expire; the Azure portal offers lifetimes of up to 24 months. When the secret expires, all accounts using that OAuth2 app fail at their next token refresh. Monitor expiration dates in Azure AD and rotate secrets before they expire.
Learn more about OAuth2 token management →
See Also
- Outlook application access - Reaching mailboxes with no interactive login
- Shared mailboxes - Delegated and direct access to a shared mailbox
- OAuth2 token management - Refresh token lifetimes and client secret expiry
- OAuth2 setup - The concepts shared by every provider
- Account troubleshooting - Consent, tenant, and redirect URI failures