Hosted Authentication
EmailEngine's hosted authentication feature provides a user-friendly web interface for connecting email accounts via OAuth2. Instead of manually handling OAuth2 flows in your application, you can redirect users to EmailEngine's authentication forms where they complete the setup process.
Overview
What is Hosted Authentication?
Hosted authentication is EmailEngine's built-in web interface for account setup. It provides:
Pre-built OAuth2 flows:
- Sign in with Google button
- Sign in with Microsoft button
- Automatic OAuth2 token management
- User-friendly consent screens
Automatic account registration:
- Creates account in EmailEngine
- Stores OAuth2 tokens securely
- Connects to IMAP/SMTP or API
- Returns user to your application
No OAuth2 code required:
- EmailEngine handles all OAuth2 complexity
- Your app just generates a form URL
- User completes authentication
- EmailEngine redirects back with results
When to Use Hosted Authentication
Good use cases:
- Quick integration - Get OAuth2 working in minutes
- Standard flows - Gmail and Outlook OAuth2
- User-facing setup - Let users connect their own accounts
- No OAuth2 expertise - Don't want to build OAuth2 flows
Not suitable for:
- Backend automation - Use direct API registration with tokens
- Custom OAuth2 flows - Use authentication server instead
- Headless systems - No user interaction available
- For custom OAuth2 management: Authentication Server
- For direct API registration: Managing Accounts
- For OAuth2 setup details: OAuth2 Setup Guide
How It Works
Authentication Flow
Step-by-Step Process
- Your application calls EmailEngine API to generate form URL
- EmailEngine returns unique authentication URL
- Your application redirects user to this URL
- User sees EmailEngine's authentication form
- User clicks provider button (Google/Microsoft)
- Provider shows consent screen
- User grants permissions
- EmailEngine receives OAuth2 tokens
- EmailEngine creates and connects account
- EmailEngine redirects user back to your application
Generating Authentication Forms
Basic Form Generation
Generate a form URL for a user:
curl -X POST https://your-ee.com/v1/authentication/form \
  -H "Authorization: Bearer YOUR_EMAILENGINE_TOKEN" \
  -H "Content-Type: application/json" \
  -d '{
    "account": "user123",
    "email": "john@gmail.com",
    "name": "John Doe",
    "redirectUrl": "https://myapp.com/settings"
  }'
Response:
{
  "url": "https://your-ee.com/accounts/new?data=eyJhY2NvdW50IjoidXNlcjEyMyIsImVtYWlsIjoiam9obkBnbWFpbC5jb20iLCJuYW1lIjoiSm9obiBEb2UiLCJyZWRpcmVjdFVybCI6Imh0dHBzOi8vbXlhcHAuY29tL3NldHRpbmdzIn0"
}
Direct the user to this URL to begin authentication.
Request Parameters
| Parameter | Required | Description |
|---|---|---|
account | No | Account ID. If not provided or null, a unique ID is generated automatically. If an existing account ID is provided, that account's settings will be updated |
email | No | Pre-fill email address on form |
name | No | Pre-fill display name on form |
type | No | Pre-select account type (skips selection screen) |
redirectUrl | Yes | Where to send user after completion |
Skipping Account Type Selection
Use the type parameter to bypass the account type selection screen and send users directly to the authentication flow:
curl -X POST https://your-ee.com/v1/authentication/form \
  -H "Authorization: Bearer YOUR_EMAILENGINE_TOKEN" \
  -H "Content-Type: application/json" \
  -d '{
    "account": "user123",
    "email": "john@gmail.com",
    "type": "AAABhaBPHsc",
    "redirectUrl": "https://myapp.com/settings"
  }'
Values for type:
| Value | Effect |
|---|---|
"imap" | Direct to manual IMAP/SMTP configuration form |
| OAuth2 App ID | Direct to that provider's OAuth2 authorization page |
The OAuth2 App ID (Provider ID) is visible in EmailEngine's Configuration > OAuth2 settings page. This is EmailEngine's internal ID for the OAuth2 application, not the provider's client ID.
Using the type parameter provides a smoother experience - users go directly to Google or Microsoft authorization without seeing an intermediate selection screen.
Implementation Example
- Node.js
- Python
- PHP
const axios = require('axios');

async function generateAuthUrl(userId, userEmail, userName) {
  const response = await axios.post(
    'https://your-ee.com/v1/authentication/form',
    {
      account: userId,
      email: userEmail,
      name: userName,
      redirectUrl: 'https://myapp.com/settings'
    },
    {
      headers: {
        'Authorization': 'Bearer YOUR_EMAILENGINE_TOKEN',
        'Content-Type': 'application/json'
      }
    }
  );

  return response.data.url;
}

// Usage in Express route
app.get('/connect-email', async (req, res) => {
  const authUrl = await generateAuthUrl(
    req.user.id,
    req.user.email,
    req.user.name
  );

  res.redirect(authUrl);
});
import requests

def generate_auth_url(user_id, user_email, user_name):
    response = requests.post(
        'https://your-ee.com/v1/authentication/form',
        json={
            'account': user_id,
            'email': user_email,
            'name': user_name,
            'redirectUrl': 'https://myapp.com/settings'
        },
        headers={
            'Authorization': 'Bearer YOUR_EMAILENGINE_TOKEN',
            'Content-Type': 'application/json'
        }
    )

    return response.json()['url']

# Usage in Flask route
@app.route('/connect-email')
def connect_email():
    auth_url = generate_auth_url(
        current_user.id,
        current_user.email,
        current_user.name
    )

    return redirect(auth_url)
<?php

function generateAuthUrl($userId, $userEmail, $userName) {
    $data = [
        'account' => $userId,
        'email' => $userEmail,
        'name' => $userName,
        'redirectUrl' => 'https://myapp.com/settings'
    ];

    $ch = curl_init('https://your-ee.com/v1/authentication/form');
    curl_setopt($ch, CURLOPT_RETURNTRANSFER, true);
    curl_setopt($ch, CURLOPT_POST, true);
    curl_setopt($ch, CURLOPT_POSTFIELDS, json_encode($data));
    curl_setopt($ch, CURLOPT_HTTPHEADER, [
        'Authorization: Bearer YOUR_EMAILENGINE_TOKEN',
        'Content-Type: application/json'
    ]);

    $response = curl_exec($ch);
    curl_close($ch);

    $result = json_decode($response, true);
    return $result['url'];
}

// Usage
$authUrl = generateAuthUrl($userId, $userEmail, $userName);
header("Location: $authUrl");
exit;
Handling Redirects
Success Redirect
After successful authentication, EmailEngine redirects to your redirectUrl with query parameters:
https://myapp.com/settings?account=user123&state=new
Query Parameters:
| Parameter | Description |
|---|---|
account | The account ID you provided |
state | Result of the operation: new (account was created) or existing (existing account was updated) |
If authentication fails (OAuth2 error, user cancellation, etc.), EmailEngine displays an error page rather than redirecting to your redirectUrl. Your application only receives a redirect on successful authentication.
The redirect happens immediately after authentication completes, but the account may still be initializing (syncing mailboxes, etc.). EmailEngine sends an accountInitialized webhook once the account is fully processed and ready to accept API calls. If you need to make API calls immediately after redirect, either wait for this webhook or poll the account status endpoint until the state is connected.
Handling the Redirect
- Node.js
- Python
- PHP
app.get('/settings', async (req, res) => {
  const { account, state } = req.query;

  if (state === 'new') {
    // New account was created
    await db.users.update(
      { id: account },
      { emailConnected: true }
    );

    res.render('settings', {
      message: 'Email account connected successfully!'
    });
  } else if (state === 'existing') {
    // Existing account was updated
    res.render('settings', {
      message: 'Email account credentials updated successfully!'
    });
  }
});
@app.route('/settings')
def settings():
    account = request.args.get('account')
    state = request.args.get('state')

    if state == 'new':
        # New account was created
        db.users.update(
            {'id': account},
            {'email_connected': True}
        )
        flash('Email account connected successfully!', 'success')
    elif state == 'existing':
        # Existing account was updated
        flash('Email account credentials updated successfully!', 'success')

    return render_template('settings.html')
<?php
// settings.php

$account = $_GET['account'] ?? null;
$state = $_GET['state'] ?? null;

if ($state === 'new') {
    // New account was created
    $stmt = $pdo->prepare('UPDATE users SET email_connected = 1 WHERE id = ?');
    $stmt->execute([$account]);

    $message = 'Email account connected successfully!';
    $messageType = 'success';
} elseif ($state === 'existing') {
    // Existing account was updated
    $message = 'Email account credentials updated successfully!';
    $messageType = 'success';
}
Retry Flow
If authentication fails, users see an error page on EmailEngine and can retry. Consider providing a "Connect Email" button on your settings page that generates a new authentication form URL, allowing users to attempt connection again.
Pre-filling Information
Email Address
Pre-fill the email address to streamline the process:
curl -X POST https://your-ee.com/v1/authentication/form \
  -H "Authorization: Bearer YOUR_TOKEN" \
  -H "Content-Type: application/json" \
  -d '{
    "account": "user123",
    "email": "john@gmail.com",  # Pre-filled
    "redirectUrl": "https://myapp.com/settings"
  }'
The authentication form will show this email address, and for Gmail/Outlook, it will be used as the login_hint parameter in the OAuth2 flow.
Display Name
Pre-fill the account name:
curl -X POST https://your-ee.com/v1/authentication/form \
  -H "Authorization: Bearer YOUR_TOKEN" \
  -H "Content-Type: application/json" \
  -d '{
    "account": "user123",
    "email": "john@gmail.com",
    "name": "John Doe",  # Pre-filled
    "redirectUrl": "https://myapp.com/settings"
  }'
This name will be displayed in EmailEngine's account list.
Advanced Features
Delegated Access (Shared Mailboxes)
For Microsoft 365 shared mailboxes, include the delegated flag:
curl -X POST https://your-ee.com/v1/authentication/form \
  -H "Authorization: Bearer YOUR_TOKEN" \
  -H "Content-Type: application/json" \
  -d '{
    "account": "shared-support",
    "email": "support@company.com",
    "delegated": true,  # Important for shared mailboxes
    "redirectUrl": "https://myapp.com/settings"
  }'
User will authenticate with their personal account but access the shared mailbox.
Learn more about shared mailboxes →
User Experience
What Users See
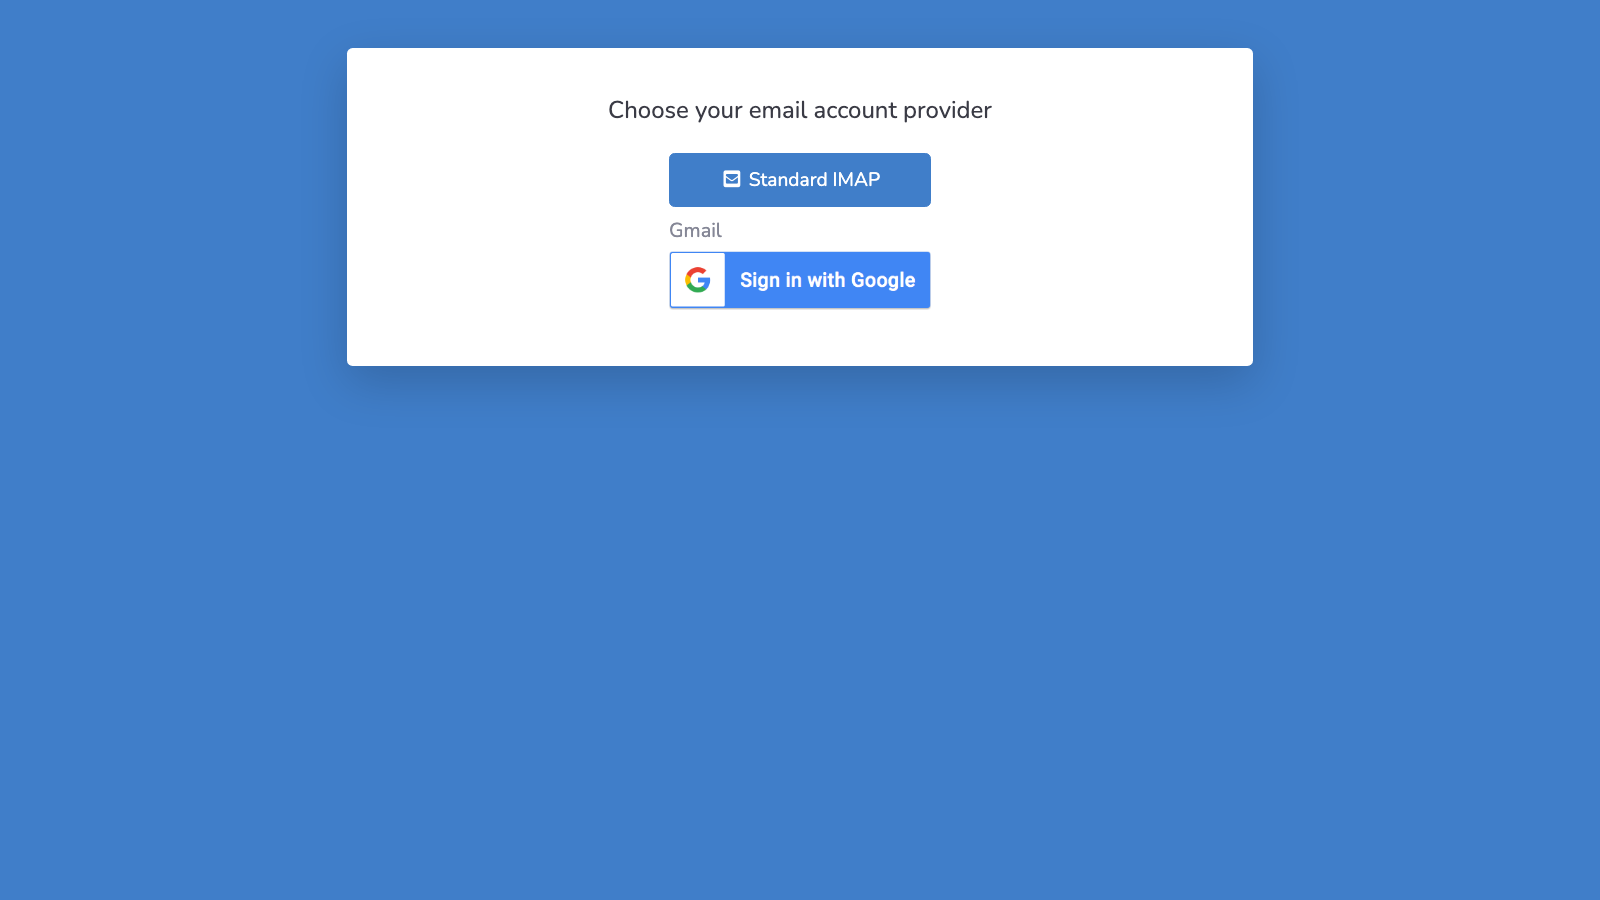
1. Account Type Selection
When multiple authentication options are available, users first choose their provider:
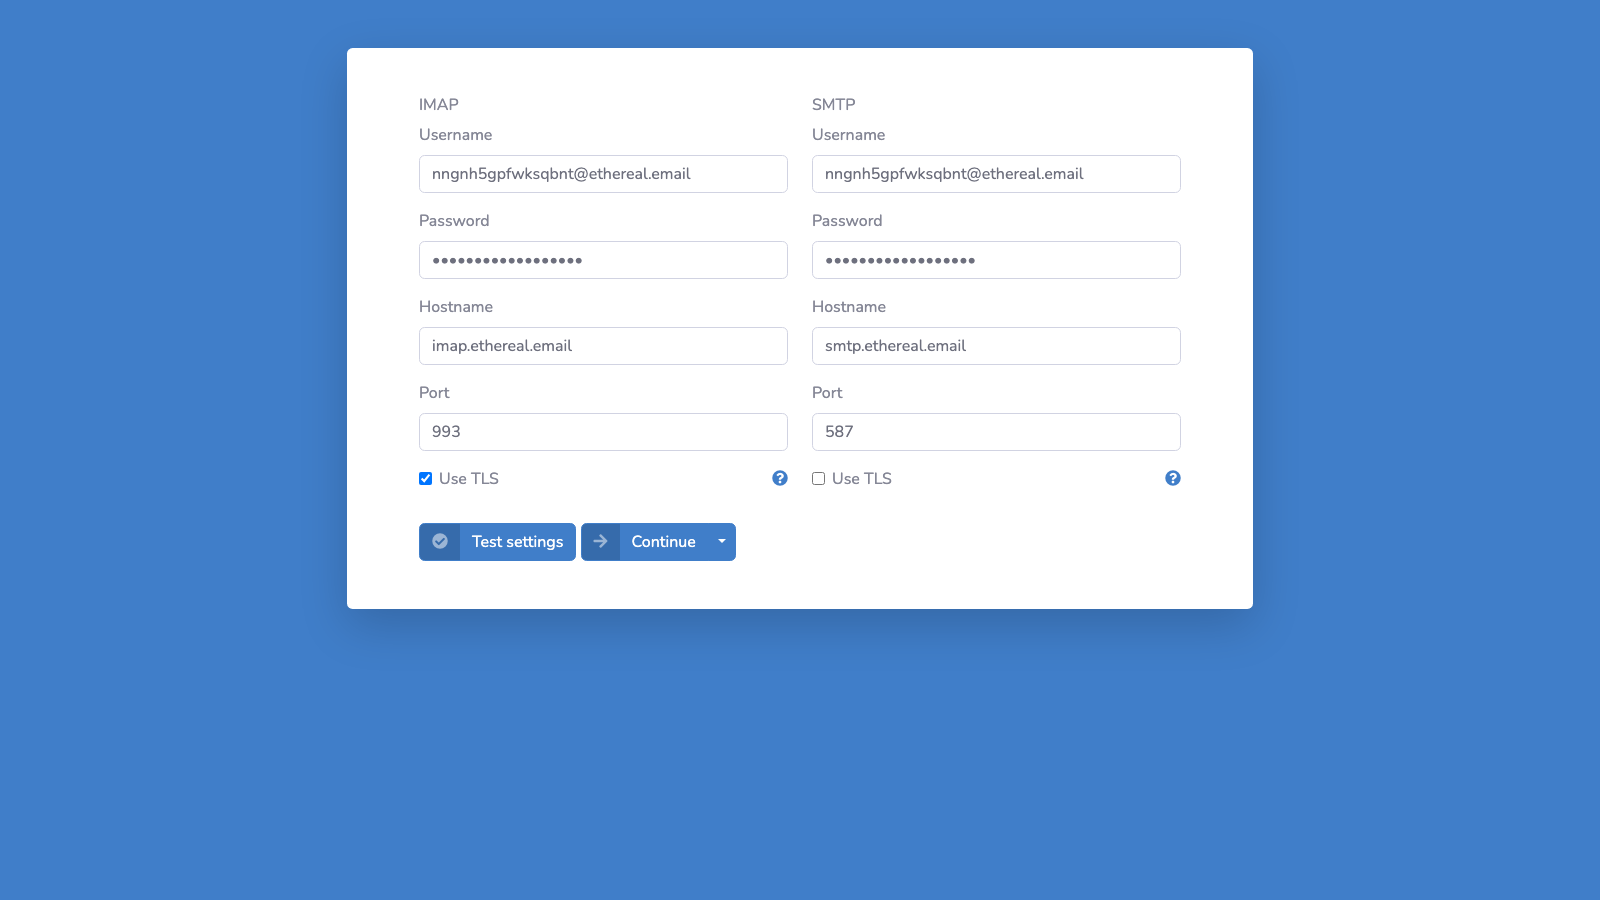
2. IMAP/SMTP Configuration (if selected)
For manual IMAP setup, users enter their server credentials:
3. OAuth2 Consent Screen (if selected)
For OAuth2 providers, users are redirected to Google or Microsoft to grant permissions.
4. Redirect Back
After successful authentication, users are automatically redirected to your application's redirectUrl.
Customization Options
Page Branding:
| Setting | Purpose | Example |
|---|---|---|
templateHeader | HTML block appended to top of page | App logo, instructions, welcome message |
templateHtmlHead | Custom <head> content | CSS style overrides, custom fonts |
These can be configured via:
- Configuration → Service page in the EmailEngine dashboard
- Settings API (
POST /v1/settings)
Example - Add custom header with logo:
<div style="text-align: center; padding: 20px;">
  <img src="https://your-app.com/logo.png" alt="Your App" height="40">
  <p>Connect your email account to get started</p>
</div>
Example - Add custom CSS:
<style>
  .btn-primary { background-color: #your-brand-color; }
  .card { border-radius: 12px; }
</style>
EmailEngine's hosted pages use Bootstrap 4. You can use Bootstrap 4 classes and override its variables in your custom CSS. See Bootstrap 4 documentation for available classes and components.
OAuth2 provider settings (configured in Google Cloud Console / Azure AD):
- App name displayed in consent screen
- App logo
- Privacy policy and terms of service links